Friday 26 April 2013

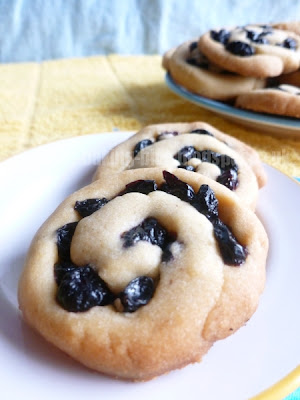
Lemon and Blueberry Shortbread Spirals


Not much has happened in the baking department this month, which is strange considering I spent half of it not having to go to work due to it being the school holidays.  I've just not felt terribly enthused to do so.  Or when I have I've been making stuff I've made before so I don't really have anything to post about.  

This week though I was determined to bake something.  Anything.  But preferably biscuits.  I enjoy making biscuits.  I was actually intending to make biscuits for me but ended up doing something for the fiancé instead since I had dried blueberries sitting in my cupboard that needed to be used up.  I decided I wanted to make lemon and blueberry biscuits.  Those two flavours have been successful in previous uses of the combination.  Plus the fiancé really likes lemon.  And since the orange shortbread turned out nice and has a good dough for shaping/cutting I thought I would just make a lemon version of that (minus the chocolate topping though).

As for the blueberry bit, as I said I had dried ones to use.  But rather than just mix them into the dough I thought it would be nice to make a spiral pattern with them, just to make it a little fancier.  My initial thought on how to do this was to roll the dough out flat, fill with blueberries and the roll up before slicing into biscuits.  That didn't work obviously.  The blueberries were too clumped together and made it difficult to roll the dough. Even when I could slice off a biscuit it just looked a mess, not a neat spiral.  So I pulled it all apart again and went about it in a different and much more effective manner.  I made sausages of dough, lined up blueberries along the and then rolled those up.  I got some lovely spirals as a result.  

The fiancé calls them 'more-ish'.  He says the two flavours blend well together, the biscuit is nice and crunchy and the berries are just the right texture: not too hard and not too chewy.  He was worried the berries would make the biscuits a bit soft but that wasn't the case.  He has to restrain himself from eating too many at a time since he likes them so much.


Makes about 20 
  • 100g/3.5oz butter, softened and diced, plus extra for greasing
  • 150g/5.3oz plain flour, plus extra for dusting
  • 50g/1.7oz caster sugar
  • 1 tsp lemon extract
  • 85g/3oz dried blueberries
  1. Preheat the oven to 180°C/350°F/Gas Mark 4 and grease two baking trays with butter.
  2. Sift the flour into a large bowl.
  3. Dice up the butter and add to the flour, rubbing it in with your fingertips until the mixture resembles fine bread crumbs and there are no large lumps of butter.
  4. Add the sugar and the lemon extract and mix together until you get a stiff dough (you may need to use your hands).  Do not add any additional liquid.
  5. Split the dough into 20 equal sized balls.  
  6. Roll a ball of dough out into a thin sausage about 10-15cm/4-6inches in length.
  7. Press blueberries gently along the top of the dough sausage.  Leave a gap of about 1cm/0.5inches between the first blueberry and the rest since it will make it easier to roll up.
  8. Carefully roll the dough into a spiral with the blueberries wrapped inside.  Once fully rolled flatten slightly and then place on the prepared trays. 
  9. Bake for 15-20 minutes, until the edges are golden.  They will still be a little soft in the centre when they come out but they do firm up as they cool.
  10. Remove to a wire rack and allow to cool.

Thursday 11 April 2013

After Eight (Chocolate and Peppermint) Cupcakes


So the other week the fiancé came home with a request from my willing taste testers in Dundee: After Eight cupcakes.  Well, I like a challenge and this was a chance to get creative, although in theory this was a fairly simple thing.  After Eights meant I would be doing chocolate and peppermint.  I knew I would definitely want a chocolate cake and ideally a very dark chocolate one.  Then I would put something peppermint in the centre.  I would also make peppermint buttercream.  Originally I was going to just drizzle dark chocolate on top but then thought it would be cool to cover the buttercream completely in chocolate instead, just to give a further impression of an After Eight.  

Now I've never dipped buttercream in chocolate before so I wasn't sure how well it would turn out.  I knew I had to chill it beforehand or it would melt when it got dipped.  I also figured it would be easier to coat the whole thing if the buttercream was piped flat against the top of the cake, rather than the usual towering swirl I do.  This all worked out fine but with every cake I had gaps in the chocolate.  I did fill as much in as possible by dripping chocolate into the gaps with a spoon but still couldn't get a perfect covering.  As a result I thought it looked a bit messy.  My testers though thought they were some of my prettiest cakes and that the slightly messy chocolate top was very reminiscent of the After Eight's patterning.


I was so glad I was able to get green cases to go with these.  It really pulls the whole design together.  I really doubted I was going to have them in time but then I luckily got offered a trip out to Rejects in Kirkcaldy and they have a cookery/baking section.  So I raided the cases they had for sale and found a set of 'Buffin' cases in five colours including green.  Rather a perfect green too.  The cases also turned out to be an ideal size for the chocolate cake recipe I chose to use.  The name 'Buffin' amuses me.  Apparently it's bigger than a bun case (which I refer to as a cupcake case) but not quite as big as a muffin case.  They're quite tall and a bit narrow but very cool.  I was very pleased with them.  I had originally wanted foil cases but these ones worked out perfectly and probably looked better overall.  If you can get green cases for these cakes, I recommend doing so.

So what was the result?  Perfect.  That's what I was told.  These cakes were perfect.  A soft but crumbly cake that was really dark with the perfect amount of peppermint running all the way through.  Apparently they tasted just like an After Eight.  I was rather proud.  
Now I really wish I had gotten better looking photos.  I just could not find a way to pose these that I was happy with.


Recipe - makes 12

Cakes - adapted from Foods of Our Lives:
  • 115g/4oz butter
  • 60g/2oz dark chocolate (I used Bournville)
  • 45g/1.5oz cocoa powder (Bournville cocoa for me)
  • 105g/3.75oz plain flour
  • 1/2 tsp bicarbonate of soda
  • 3/4 tsp baking powder
  • 2 large eggs
  • 150g/5.25oz caster sugar
  • 1 tsp vanilla extract
  • 1/2 tsp salt
  • 115ml/4fl.oz sour cream
  1. Preheat the oven to 180°C/350°F/Gas Mark 4 and line a 12 hole muffin tin with 'buffin' cases (or muffin if you can't find 'buffin').
  2. Put the butter, chocolate and cocoa powder in a glass bowl and place over a saucepan of gently simmering water.  Stir until the butter and chocolate have melted and the mixture is smooth.  Whisk if you need to.  Set aside to cool slightly.
  3. Combine the flour, baking powder and bicarbonate of soda in a small bowl.
  4. In a separate, larger bowl beat the eggs, sugar, vanilla and salt until pale and frothy.
  5. Add the chocolate mixture to the egg mix and stir in until fully incorporated.
  6. Add a third of the flour mixture and stir in.
  7. Now add the sou cream, mix, and then the rest of the flour.  Beat until smooth.
  8. Divide the batter evenly amongst the cases.
  9. Bake for 20-25 minutes until the cakes are risen and the tops are springy.  A skewer inserted into the centre should come out clean.
  10. Remove from the oven and allow to sit in the pan for 10 minutes before transferring to a wire rack to finish cooling.
Filling:
  • 115g/4oz icing sugar
  • 1 tsp peppermint extract
  • 25ml/1fl.oz water
  • Green, blue food colouring
  1. Put the icing sugar, peppermint extract, a couple of drops of green and the tiniest amount of blue colouring into a small bowl.
  2. Add a tablespoon of the water and mix in until smooth.
  3. Add the rest of the water a little at a time, mixing after each addition until you get a smooth but fairly runny paste.
  4. Cut a core out of the cooled cupcakes and put about a teaspoonful of the filling into each one.  Replace the cores.
Mint Buttercream:
  • 170g/6oz butter
  • 340g/12oz icing sugar
  • 3/4 tsp peppermint extract
  • 1 tsp water
  • Green, blue, white(optional) food colouring
  1. Beat the butter until smooth and creamy.
  2. Add the icing sugar, peppermint extract and water and beat together until smooth.
  3. Add a few drops of green, one blue and a little white if using and mix until colour is evenly spread through.
  4. Put the buttercream into a piping bag fitted with a large star nozzle.
  5. Pipe a flat spiral that completely covers the top of each cake.
  6. Put cakes in the fridge to chill for 2-3 hours to allow the buttercream to firm up.
Chocolate top:
  • 170g/6oz dark chocolate (I used Green & Black's 70% cocoa) 
  1. Once the buttercream is firm, break up the chocolate and melt in a glass bowl placed over a pan of gently simmering water.
  2. Take the cakes out of the fridge one at a time, hold by the base and dip into the chocolate, submerging the buttercream up to the edge of the case.
  3. Remove and shake gently over the bowl to get rid of any excess chocolate.
  4. Turn right way up and use a small spoon to drizzle chocolate into any exposed gaps.  You want to hide as much buttercream as possible.
  5. Leave on a wire rack to set.

Monday 8 April 2013

Lemon Fudge


I love fudge.  Absolutely love it.  Have done since I was 13 and visiting the Cornish village of Padstow during a school trip.  There were so many places selling the stuff and it was amazing.  However I've only really had the traditional kinds like vanilla and chocolate.  Then back in 2011 my fiancé took me to the Highland Games they hold in the local park and there we happened across a fudge stall selling all sorts of flavours.  We bought a box of four types: Malteser; Irish cream (which I didn't realise was a liqueur at the time); citrus (three stripes flavoured with lemon, orange and lime) and...I cannot remember the fourth kind.  I remember wishing I'd taken some of the strawberries and cream fudge.  It did look rather fantastic.  Anyway, the point I'm trying to get to is that the citrus fudge was flat out wonderful and so very different from anything I'd had before.  The fiancé also really enjoyed it and he's not really a fudge person.  Next year couldn't come fast enough and we eagerly went along to the games with the sole purpose of procuring more fudge.  Imagine our disappointment when we could not find the stall anywhere.  It was quite devastating.  Luckily there were cute owls to cheer us up.

I feel I'm digressing slightly.  Back to today's fudge.  Now as much as I love the stuff, I've only ever attempted to make fudge once before, back when I was at university.  Proper fudge where you have to cook the sugar to a certain temperature and all that.  It wasn't very successful.  I couldn't really tell if I had the right temperature since I didn't have a sugar thermometer at the time.  I did try the soft ball test but honestly had no idea if the results I got were the ones I was meant to get.  The result was a sticky goop that would not set.  The fiancé on the other hand has made it at least once a year for four years now, improving each year but still not quite getting fudge at the end.  And as much as I would like to perfect the proper method one day, sometimes it's nice when you stumble across a recipe which is a bit of a cheat but still gives a great end product.

I love this recipe.  It was so quick and simple and after it had set the fudge I ended up with was fantastic.  I admit when I first found it I wasn't sure if I would be able to find a lemon pudding mix and so was all set to try and make my own from scratch.  However I did find a pack when grocery shopping and it was so inexpensive that I thought I would just go that route.  I would like to try the completely from scratch method one day though.  

I got 64 pieces of fudge from this recipe.  It is really delicious and has almost the right fudge-like texture.  It's maybe just a little bit soft but it is so very lemony that I don't really mind.  Maybe it'll firm up a little more over time.  The fiancé loves it too and keeps going back for 'just one more'. An all around success really and definitely one for the recipe folder.


Recipe - adapted from Group Recipes
  • 115g/4oz butter, plus extra for greasing
  • 120g/4.3oz lemon pudding/pie mix (I used Green's Lemon Pie Filling)
  • 125ml/4.5fl.oz milk
  • 535g/19oz icing sugar, plus extra for rolling
  • 1 tsp lemon extract
  1. Line a 23cm/9inch square tin with foil and then grease the foil with butter.
  2. Put the butter, milk and pudding/pie mix into a large saucepan and whisk over a gentle-medium heat until the mixture has thickened and is smooth.  Do not allow it to overheat or it will turn into a lumpy mush you can't do anything with.
  3. Take off the heat and add the lemon extract and icing sugar.  Whisk together until smooth.
  4. Pour out into the prepared tin and smooth over.
  5. Put in the fridge to set.  This will take about 2-3 hours.
  6. Once set, remove from fridge and separate from the tin by lifting it out by the foil.
  7. Remove the foil and then cut into cubes.  I cut an 8x8 grid so got 64 pieces.
  8. Roll pieces in icing sugar and store in an airtight container in the fridge.