Showing posts with label marshmallow. Show all posts

Thursday, 10 April 2014

Easter Bunny Tea Cakes


It's a new month and so there's a new Dessert Challenge to take on.  This time is Marshmallow and White Chocolate with an Easter theme!

So, once again, things did not go to plan on the first attempt for this challenge.  I had intended to keep it simple.  No-bake even!  I was going to attempt rice krispie treats that were cut into rabbit shapes with a cookie cutter and glazed in white chocolate.  It sounded simple enough.  Turns out it wasn't.

Now, I have to confess, I have never made this kind of thing before.  I've coated rice krispies in chocolate: that is the extent of a krispie treat for me.  Fusing it all together with melted butter and marshmallow was completely new territory. But it shouldn't be that hard, right?  Well, the problem I had was with ratios.  All the recipes I found were American and the cups measurement annoys me.  I also only had 170g/6oz of marshmallows and the local shop did not have any more so I was trying to work with that too and adjust things accordingly.  It seemed to be going okay.  I got a nice goopy mess to throw my rice krispies into and it went into the pan fine and was easily pressed into place.  Problem was that when it had set it was really quite hard and when I tried to cut it everything crumbled (and a fair bit went all over the floor).  It was most annoying.  So then I was stuck with a dilemma.  Do I start over, but use marshmallow cream instead of actual marshmallows because I had none of those left and I can make the cream from scratch?  Or do I try and do something else, again with cream instead of actual marshmallows.

After brooding most of the day I had come to a vague conclusion that I could make some sort of brownie (I was thinking lemon because we all know that goes great with white chocolate) with a layer of marshmallow cream on top which would be cut and covered in the glaze.  Similar idea to the krispies really.  However, I couldn't help but think that the marshmallow cream would not be stiff enough.  Maybe I should make actual marshmallows (it is something I want to try at some point) or see if I could find something that would hold its shape better.  It was during this train of thought that I remembered that during Great British Bake Off 2012 they had made marshmallow to go inside tea cakes.  Perhaps that would be a better consistency.  So I pulled out the book and found the recipe.  And that's when it hit me: why not make tea cakes?  I had acquired the mould for doing so over a year ago and never gotten around to it.  I could do the shell in white chocolate instead and decorate them to look like rabbits!  I could even flavour the biscuit with lemon!  I was so pleased with the idea that I immediately got to work and they were practically finished by the end of the night (I did the faces the following morning).  And you know what, they were a much better idea than the original.  GBBO and Mary Berry save the day again! 


Now, it may look a bit daunting but the individual parts of this recipe are actually fairly simple.  I'll admit, I did have a fight with the biscuit dough.  It was very crumbly (but that might be me messing with the recipe by not using half wholemeal flour and half plain because I had none of the former) and there was only just enough to make 6.  But really, its just a few steps that take a lot of time and patience.  Unfortunately, it is one of those recipes where you won't know if you've messed up until almost the very end since everything is hidden inside the moulds.  The most nerve-racking bit is removing the tea cakes from said moulds as so many things can go wrong.  Maybe the seal wasn't perfect and so the base comes away from the shell.  Or the shell is too thin and breaks as you try and get it out of the mould.  Or, as was the case for me, the chocolate has bloomed!

Oh I was so unhappy.  Everything had been going so well.  But the chocolate bloomed and so I have some rather unsightly white patches on my pretty cream bunnies.  They have not affected the taste but they do make them look less appetising.  I have taken advantage of the wonders of modern technology to make it less obvious in the photos (a little dishonest, I know).  But the chocolate shouldn't have bloomed.  That is not the fault of the recipe.  That was me clearly making a mistake, and I think I know what it was.  I was really concerned about the shell being too thin because I could just see traces of pink (the colour of my mould) through the chocolate already setting.  So I thought I would add a second layer, just to be safe.  Unfortunately I was a bit silly and remelted some of the chocolate I had left and applied it to the shells whilst it was still too warm.  So that would have messed with the fats and cocoa butter and resulted in bloom.  At least, that's the only reason I can think of.  The main cause of bloom in these is apparently cooling them in the fridge, which I made sure not to do.  Ah well.  You can also see my joins are not perfect.  And my biscuits are actually on upside-down.  That latter one I will blame on the recipe because I got really confused by the instructions. 

But despite blooming bunnies, these things did come out intact and they are amazing.  The chocolate is a little thick (again, that's down to me being paranoid) but once you break through...my goodness these are delicious.  The three flavours are just so good together, though they are very sweet.  The fiancĂ© really likes them.  His exact words were, "I would punch someone in the kidney to get the last one!"  Which translates to an 'A' rank apparently. ('C' is, "I wouldn't say 'no' if offered another," and 'B' is "I would push past people to get one".)  He also has no complaints about them needing to be eaten fairly quickly and has bravely accepted the challenge of devouring them all within the next day or so.  I'll need to be on the ball to make sure I get one myself!


Recipe - adapted from The Great British Bake Off: How to turn everyday bakes into showstoppers
Makes 6

This recipe requires a 6-hole silicone semi-dome mould with the holes having a maximum diameter of 7.5cm/3inches

Shell:
  • 300g/10.5oz white chocolate
Biscuit Base:
  • 100g/3.5oz plain flour (or 50g/1.75oz plain flour and 50g/1.75oz wholemeal flour)
  • Pinch of salt
  • 1/2 tsp baking powder
  • 25g/1oz caster sugar
  • 25g/1oz butter
  • 1.5 tbsp milk
  • 1 tsp lemon extract
  1. Break up the white chocolate and place in a heat proof bowl.  Sit the bowl over a pan of barely simmering water (without letting the bowl touch the water) and melt the chocolate, stirring occasionally until smooth.  Remove from the heat and set aside to cool and firm up slightly.
  2. Make the biscuit by first combining the flour, salt, baking powder and sugar in a mixing bowl.
  3. Cut the butter into pieces, add to the dry ingredients and rub in with your hands until the mixture resembles breadcrumbs and there are no large lumps of butter left.
  4. Add the milk and lemon extract and work into the mixture with your hands until it comes together to form a very stiff dough.
  5. Cover a tray with baking parchment.
  6. On a lightly floured surface, roll the dough out to 0.5cm/0.25inches thick and cut out circles using a cutter the same width as the moulds being used.  (The original recipe is 7.5cm/3inches, mine were 6.5cm/2.5inches.  Don't go bigger than 7.5cm/3inches as you won't have enough dough).
  7. Place on the prepared baking tray and chill in the fridge for 10-15 minutes whilst you preheat the oven to 160°C/325°F/Gas Mark 3. 
  8. Bake the biscuits for 10-12 minutes, until just firm then remove and allow to cool on a wire rack.
  9. Make sure the semi-dome mould is clean by giving all the holes a quick wipe with some kitchen roll.
  10. Pour about a tablespoon of chocolate into each hole.  Use the back of the spoon to start spreading it over the inside of the domes and then tip and swirl it about so that all the inside is covered in a layer of chocolate.  (This is a long, slow process so be patient).  Try not to make the chocolate too thin or too thick since you neither want it to break or be to hard to bite through.  (Mine was a bit too thick...)  The chocolate should thicken up as you do this, meaning less with pool in the bottom of the moulds.
  11. Leave the chocolate somewhere cool to set, but not in the fridge.
  12. Once the biscuits have cooled, dip them into the remaining white chocolate to coat them completely then leave them to set on a sheet of baking parchment.
Marshmallow:
  • 3 egg whites
  • 150g/4.5oz caster sugar
  • 2 tbsp golden syrup
  • 1/2 tsp salt
  • Seeds of half a vanilla pod
  1. Put all the ingredients in a large, heatproof bowl and place over a pan on simmering water, without the bowl touching the water.
  2. Use an electric whisk to beat the ingredients together for several minutes until you get a glossy meringue with very stiff peaks.
  3. Remove from the heat and beat for several more minutes until the mixture is thick and cooled.
  4. Leave until it is completely cold.
 Assembly:
  • 100g/3.5oz white chocolate
  • 60g/2oz milk chocolate chips
  1. Melt the white chocolate as before and then leave to cool until it thickens up and reaches a piping consistency.
  2. Put the melted chocolate into a piping bag, and the cold marshmallow into another.
  3. Remove the biscuits from the paper and place with the flat side down (so the way they were sitting on the parchment).
  4. Fill each of the set chocolate domes (still in the moulds) by piping the marshmallow inside.  Fill up to the rim of the domes then run a knife flat along the top to remove any excess.  Wipe off anything that got on the outside of the moulds.
  5. Pipe a little bit of white chocolate onto the marshmallow and then a ring of it around the edge of each biscuit.
  6. Place a biscuit (chocolate ring side down) on top of each marshmallow-filled dome.  Smooth the join with a knife.  If necessary, pipe a little more chocolate around the edges to fully seal the domes so no marshmallow is visible.
  7. Leave to set in a cool place (again, not the fridge) until completely sealed together.
  8. Whilst you wait, melt the milk chocolate chips as you did the white chocolate and then set aside to thicken up to a piping consistency.
  9. Carefully remove the domes from the mould. (I found that if I tugged the mould away from the edges carefully first, I could then gently pop them out one by one).
  10. Put the melted milk chocolate into a piping bag fitted with a small, round tipped nozzle then pipe ears, eyes, noses and tails onto each of the domes to create bunnies.  Leave to set.
  11. Store in an airtight container in a cool place (not the fridge) and consume within 2 days.

Thursday, 9 January 2014

Chocolate and Marshmallow Brownies


So it's a brand new year and thus begins a brand new set of dessert challenges over at Lady Behind the Curtain.  There are certainly some interesting ones coming up, that's for sure (bacon and maple?!).  Anyway, this month starts us off with something fairly simple: chocolate pudding (or cocoa) and marshmallows.  Admittedly, I was not entirely sure what it meant by 'chocolate pudding' so I opted for the cocoa option.

I decided I to kill two birds with one stone with this bake.  Not only would it be my challenge bake but it would also be the bake that I would give to my friend Jess when I saw her on Saturday.  I know Jess likes brownies so that seemed like an ideal choice for both categories.  What did we do Saturday?  Well, we went to see The Lion King in Edinburgh!  It was so cool!  All the costumes and singing.  I was grinning like an idiot throughout the whole thing.  Jess also brought along the other part of my Christmas present which was a handmade doll of one of my characters.  It's amazing!  It has bendy hands and removable clothes and is just wonderful!  So I felt extra guilty as I did a very stupid thing and forgot to bring the brownies with me!  They were made and bagged up and everything.  I just didn't take them out of the fridge and put them in my bag in the morning.  I only realised when I was sitting in Kirkcaldy station waiting for the train.  Very stupid of me indeed!  So I posted them to her first thing Monday morning and she got to enjoy them Tuesday instead.  Better late than never I suppose.


The idea for these was sparked by the idea of hot-chocolate, since cocoa and marshmallows invokes that image.  So I could make chocolate brownies and have marshmallows on top.  But when I think hot-chocolate, I also think cream.  The classic image comes with a lovely swirl of cream on top of the drink upon which the marshmallows sit.  But I didn't want to put cream on the brownies but there should be something to represent it.  That's when I stumbled across Love and Olive Oil's Peppermint Bark Brownies (thank you Pinterest), with their layer of white chocolate on top.  That would be perfect!  Plus the brownie recipe itself looked to be a good one to work with, with a little tweaking so it wasn't peppermint of course.

Now, someone out there may remember that I am not a brownie aficionado.  I do not like them and hence have not really baked them.  I did make one attempt at blondies last year but ended up with something more akin to cakes due to making a mistake with my choice of flour.  This meant I was a little apprehensive going in to this bake, and throughout as I had no idea what each stage should look like.  However, there didn't seem to be any disasters and when the brownies came out and were cut up I thought they looked right (very compacted and moist looking).  

Turns out they taste really good too.  The fiancĂ© says I always bake well with chocolate and that all the parts melded together well.  And I got very excitable texts from Jess saying how yummy they are and that she had already eaten a number of them.


Recipe - adapted from Love and Olive Oil
Makes 18
Brownies:
  • 115g/4oz milk chocolate
  • 115g/4oz dark chocolate
  • 115g/4oz butter
  • 85g/3oz plain flour
  • 2 tbsp cocoa powder
  • 1/2 tsp salt
  • 125g/4.5oz caster sugar
  • 2 eggs
  • 1 tsp vanilla extract 
Topping:
  • 170g/6oz white chocolate
  • 1.5 tbsp vegetable margarine / vegetable shortening (I used Stork)
  • 150g/5oz small marshmallows
  1. Preheat the oven to 180°C/350°F/Gas Mark 4 and grease and line a 20cm/8inch square cake tin with baking parchment, making sure to leave a slight overhang so you can lift it out later.
  2. Break up the chocolate and cut the butter into cubes.
  3. Place a medium sized glass bowl over a pan of gently simmering water (without letting the bowl touch the water) and melt the chocolate and butter together, stirring occasionally.
  4. Meanwhile, sift together the flour, cocoa powder and salt into a small bowl and put to one side.
  5. When the chocolate and butter are completely melted, whisk them until smooth and remove from the heat
  6. Whisk the sugar into the chocolate mix until it has dissolved and the mixture has cooled slightly.
  7. Add the eggs and vanilla extract and whisk until just combined.
  8. Add the flour mix and gently fold in using a rubber spatula until incorporated.
  9. Pour the batter into the prepared tin.
  10. Bake for 25-30 minutes or until a skewer inserted into the centre comes out clean.
  11. Transfer the pan to a wire rack and allow to cool completely.
  12. Melt the white chocolate and margarine/shortening together in a glass bowl placed over a pan of gently simmering water.  Be careful not to overheat it so stir once in a while to keep the temperature down.
  13. Remove from the heat before completely melted and stir until it finishes melting.
  14. Spread over the top of the cooled brownies in a thin, even layer.
  15. Decorate with marshmallows.
  16. Chill in the fridge overnight.
  17. Remove the brownies from the pan and use a large knife to cut them into 9 squares.  Cut each of these squares in half diagonally so that you end up with 18 triangles.

Wednesday, 27 February 2013

S'mores Cupcakes


I have been in a marshmallowy mood this week.  It did start with the desire to make marshmallow and chocolate stuffed chocolate chip cookies, but they didn't quite work out due to the cookie dough being too...spreadable and everything falling apart in the oven.  Very disappointing, but I'll go into that properly when I remake them successfully and do a write up.

Anyway!  S'mores cupcakes was what I decided I wanted to make for the fiancĂ© to take on his weekly trip to Dundee.  So I found a recipe by browsing around the internet for which I had all the ingredients and that looked good.  I did have to make one change though, which was that I used McVities Digestives in place of Graham crackers.  We don't have those here in the UK and on the rare occasions I've made s'mores (mainly back when I was a Brownie), we used Digestives or Rich Teas for the base.  Yum yum!  Besides, the fiancĂ© really likes Digestives and I happened to have a packet sitting in the cupboard.  I reduced the cocoa slightly, but only because I didn't have quite enough.  Didn't seem to make much of a difference.   I also ended up putting a little too much bicarbonate of soda in.  I picked up the wrong spoon!  I added less baking powder to compensate and again, nothing seemed amiss with the final result.


So the final product has a Digestive crumb base, topped with a little chocolate, then chocolate cake sprinkled with more biscuit and chocolate, and finished off with a swirl of toasted marshmallow fluff.  As usual, my marshmallow fluff is homemade rather than store bought.  I don't think you can get that over here either?  I've not seen it anyway.  I had to toast mine under the grill, since I don't own a blowtorch.  I had to watch them diligently and rotate them about to get an even toasting, since the flame for my grill runs down the centre of my oven.  The result was good though.  A slightly firm exterior with a squishy, soft interior.  The fiancĂ© said it was perfect, having expected it to be a bit rubbery.

What can I say?  They were very well received.  The biscuit base proved to be popular with everyone, as was the marshmallow.  Again, it was a really moist cake due to it being a very wet batter.  And it's definitely reminiscent of s'mores.  Quite a nice alternative indeed!


Recipe - adapted from The Martha Stewart Show and Bake me I'm yours...Sweet Bitesize Bakes
Makes about 12


Cake:
  • 200g/7oz caster sugar
  • 140g/5oz plain flour
  • 40g/1.5oz cocoa powder
  • 1 tsp bicarbonate of soda
  • 1/2 tsp baking powder
  • 1/2 tsp salt
  • 1 large egg
  • 125ml/4.5fl.oz milk
  • 60ml/2fl.oz sunflower oil (or any other flavourless oil)
  • 1 tsp vanilla extract
  • 125ml/4.5fl.oz boiling water
Digestive Base:
  • 40g/1.5oz caster sugar
  • 90g/3oz McVities Digestive biscuits - about 6 or 7 biscuits worth 
  • 40g/1.5oz butter
  • 125g/4.5oz milk chocolate
Marshmallow Fluff Topping
  • 1 large egg white
  • 125g/4.5oz caster sugar
  • 25g/1oz golden syrup
  • Pinch of salt
  • 1/4 tsp cream of tartar
  • 1 tbsp water
  • 1 tsp vanilla extract
  1. Preheat the oven to 180°C/350°F/Gas Mark 4 and line a 12 hole muffin tin with muffin cases.
  2. Sift the sugar, flour, cocoa powder, baking powder, bicarbonate of soda and salt together into a large bowl.  Mix together with a spoon.
  3. In a separate bowl, mix the eggs, milk, oil and vanilla extract until combined.
  4. Add the wet ingredients to the dry and stir in to combine.
  5. Add the boiling water and stir until smooth, with the batter being even in colour and consistency.  Put to one side.
  6. Melt the butter and in the meantime, crush the biscuits in a bowl until you get small crumbs.
  7. Add the melted butter and sugar to the biscuit crumbs and mix together.
  8. Chop up the chocolate into small pieces.
  9. Put 1 tablespoon of biscuit crumb mix in the base of each muffin case and press down with the end of a rolling pin.
  10. Sprinkle 2 teaspoons of chopped chocolate on top of each base.
  11. Put them in the oven for about 5 minutes.
  12. Remove and fill each case three quarters full with the cake batter.
  13. Sprinkle the remaining biscuit mix and chocolate on top then put back in the oven and bake for 20-30 minutes until the cakes are springy and a skewer inserted into the centre comes out clean.
  14. Allow to cool in the tin for 10 minutes before transferring to a wire rack.
  15. Whilst the cakes cool, put a heatproof bowl over a saucepan of simmering water.
  16. Place everything for the marshmallow fluff except the vanilla extract in the bowl.
  17. Whilst it is heating, stir with an electric whisk for several minutes (about 10) until you get shiny peaks.
  18. Remove from the heat and whisk for another two minutes to thicken it up.  
  19. Add the vanilla and whisk in too.
  20. Allow to cool.
  21. Switch on the grill and spoon into a piping bag fitted with a large round nozzle and pipe swirls on top of each cake.
  22. Place four cupcakes at a time on a tray and place under the grill.  Remove every 30 seconds to check how they are doing and rotate if necessary.  You want only a light brown toasting.

Tuesday, 15 January 2013

Hot-Chocolate Cupcakes


I have a few cakes that I want to bake at the moment and these are one of the recipes I really wanted to try.  I ran the idea by the fiancĂ© as a possibility for cakes to take to Dundee for him and his friends tonight and he was all for them.

So these are hot chocolate cupcakes, containing about half a pint of milk and drinking chocolate.  The recipe for the cakes themselves is from the Hummingbird Bakery although I decided to go a different route for the topping.  Rather than using drinking chocolate and making a buttercream I thought I would top it with cream instead, like people do with hot chocolate, and then decorate with marshmallows and chocolate sprinkles to finish the look.

I was really happy with how they turned out, except for the fact that they sank a bit after they had came out of the oven.  I wasn't sure why but then I looked over the recipe and realised I had misread the amount of baking powder!  I only used a teaspoon, rather than a tablespoon, which was a bit silly of me.

Despite my mistake though, the fiancĂ© says they taste delicious and are very creamy.  For an idea of what they taste like, I was told it's like when the cream on top of your hot chocolate has taken on some of the chocolate flavour.


Recipe - adapted from Cake Days
Makes about 12

  • 240ml/8.5fl.oz full fat milk
  • 25g/1oz hot chocolate powder
  • 80g/3oz unsalted butter
  • 280g/10oz caster sugar
  • 240g/8.5oz plain flour
  • 1 tbsp baking powder
  • 1/4 tsp salt
  • 2 large eggs
  • 200ml/7fl.oz double cream 
  • 36 mini marshmallows
  • Chocolate sprinkles
  1. Preheat the oven to 190°C/375°F/Gas Mark 5 and line a 12 hole muffin tray with muffin cases.
  2. Warm the milk over a gentle heat but don't boil it.
  3. Add the hot chocolate powder and mix in until dissolved, then set aside to cool. 
  4. Put the butter, sugar, flour, baking powder and salt in a large bowl and use an electric mixer to slowly whisk them together until you get something resembling fine breadcrumbs.  You can probably get this result with a spoon but it will take a long time.
  5. Put the cooled chocolate milk into a jug, add the eggs and beat together.
  6. Add three quarters of the mixture to the dry ingredients and mix together until well incorporated and smooth.
  7. Add the rest of the chocolate milk, beating until smooth.
  8. Divide the mixture across the muffin cases, filling each about two thirds of the way up.  You may have excess mixture, so just put it into spare muffin cases and bake those too.
  9. Bake for about 20 minutes, until the cakes are risen and a skewer inserted into the centre comes out clean.
  10. Leave to cool completely before decorating.
  11. Whip the cream until it holds stiff peaks and then put into an icing bag fitted with a large star nozzle.
  12. Pipe swirls on top of each cake, then decorate with chocolate sprinkles and top with three marshmallows per cake.  

Thursday, 1 November 2012

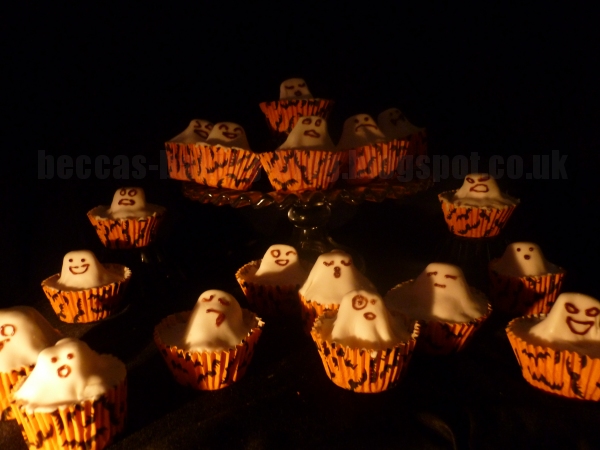
Marshmalloween Ghost Cupcakes


These are my favourite cakes out of the ones I made for Halloween, both in terms of taste and looks.  They just came out so cute!  And vanilla, marshmallow and fondant is a wonderfully sweet combination.  I kept most of these for myself, rather than taking them to work.  I took four into my work and gave none to the fiancĂ©.

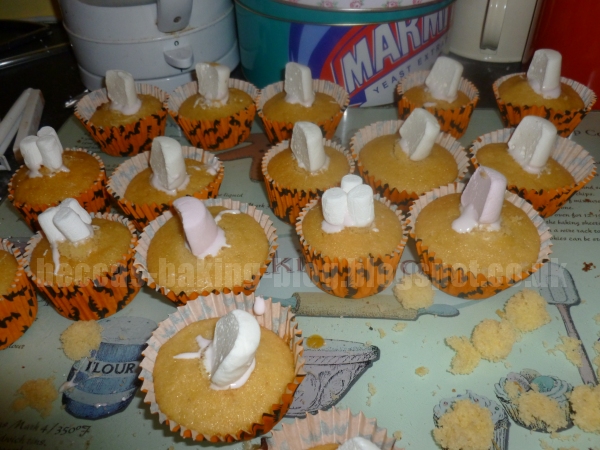
So these ones are a vanilla cake, with a marshmallow centre.  They were then topped with a marshmallow and covered in a layer of ready-to-roll fondant to look like little ghosts.  I was quite proud of them, since I was pretty much making it up as I went along.  I even made vanilla buttercream to use for sticking the fondant on but then had so much melted marshmallow left over that I ended up using that instead, and really, I think that was the better option.  I had a much easier time putting the marshmallow in this time around.  I don't know if it was because I used bigger marshmallows or a bigger pan and bowl for melting.  Whatever I did, it made my life easier.

In the recipe write up, I'm going to do something I've not done before, which is post pictures of some of the decorating process, since I took some photos as I was doing it.  Admittedly not the best photos because the light wasn't that great but hopefully still helpful.


Recipe - makes 18
  • 150g/5oz butter
  • 150g/5oz caster sugar
  • 1 tsp vanilla extract
  • 3 eggs
  • 175g/6oz self-raising flour
  • 200g/7oz bag of large marshmallows
  • 300g/10.5oz ready-to-roll fondant icing
  • Chocolate flavoured writing icing
  1. Preheat the oven to 180°C/350°F/Gas Mark 4 and line a 12 hole cake tin and a 6 hole cake tin with cases.
  2. Cream the butter and sugar together in a large bowl until pale and fluffy.
  3. Add the vanilla extract and beat in.
  4. Add the eggs one at a time, and beat until fully incorporated after each addition.
  5. Sift in the flour and fold into the mixture.
  6. Spoon into the cases, trying to distribute the mixture equally.
  7. Bake for about 20 minutes.  The cakes should be risen and golden, and a skewer inserted into the centre should come out clean.
  8. Leave to cool on a cooling rack.

  1. Melt the marshmallow while you wait.  Count out 9 large marshmallows and put to one side.  Put the rest into a large glass bowl set above a pan of simmering water.  Don't let the bowl touch the water.  You will want to keep the bowl warm after all the marshmallow has melted because if it is allowed to cool too much, it becomes hard to work with.
  2. When the cakes have cooled, use an apple corer or a knife to carve a hole in the centre of a cake.  Do not get rid of the cake 'core' you removed.
  3. Fill the hole with melted marshmallow.
  4. Cut the top off the 'core' and put this top back into the top of the cake to cover the marshmallow. 
  5. Cut the remaining marshmallows in half, dab the base in melted marshmallow and use it to stick them to the centre of the top if the cakes.
  6. Drizzle the remaining melted marshmallow around the edges of the cake.
  7. Knead the fondant until pliable and then roll out small amounts into thin squares that are bigger than the cakes.
  8. Drape the fondant over the marshmallow and gently push down to cover the cake.
  9. Press your finger around the fondant against the edge of the cake case and it should cut through the icing, giving you a smooth finish.
  10. Use the writing icing to pipe faces on the wider side of the ghosts.

Wednesday, 11 July 2012

Chocolate and Marshmallow Cupcakes


And I'm back.  Lack of updates was due to being on holiday in Italy.  I have to admit, halfway through the week I was going a bit mad and wanting to bake.  And I did bake pretty much as soon as I got home, but I made Florentines again for a present and since I've already posted about them I didn't see the point in posting again.

Anyway, my boyfriend asked me if I would make cakes for him weekly visit to see his friends.  I gladly agreed because I love any excuse to bake.  This was something I thought up whilst I was away and then researched the best way to do things when I returned.  Having a reason to make them was great.  So these are chocolate cupcakes, with a marshmallow centre and topped with marshmallow fluff and drizzled chocolate.  

According to my boyfriend they are really yummy.  Apparently the marshmallow compliments the chocolate well and balances everything out.  So yay!  A success!

I ended up using a couple of different recipes for this, one for the chocolate cakes and one for the marshmallow fluff on top.  Reading around made me decide to add the marshmallow centres after cooking rather than putting a marshmallow in when it was baking.  I admit, the method was tricky because the marshmallow is so sticky but I got there in the end.


Chocolate Cupcakes (with added marshmallow filling) Recipe: - adapted from Cupcakes and Muffins
Makes 12/13
  • 200g/7oz butter
  • 140g/5oz caster sugar
  • 1 tsp vanilla extract
  • 3 eggs
  • 150g/5.5oz self-raising flower
  • 55g/2oz cocoa powder
  • 120-150 mini marshmallows 
  • Small knob of butter
  1. Preheat the oven to 180C/350F/Gas Mark 4.
  2. Put large-ish cupcake cases in a cupcake tray.
  3. Cream together the butter and sugar until it is light and fluffy.
  4. Add the vanilla and beat.
  5. Lightly beat the eggs in a separate bowl and then gradually add to the sugar/butter mix, stirring in after each addition.
  6. Sift together the flour and cocoa powder and fold into the rest of the mixture.
  7. Spoon the mixture into the cases and then bake in the oven for 20-25 minutes.
  8. Allow to cool on a cooling rack.
  9. Put the marshmallows in a glass bowl over a saucepan of simmering water along with the knob of butter.
  10. Once they start melting, stir until smooth.  Leave over the water.
  11. Use a knife to carve a hole out of each cake.  Place the cake from the hole to one side because you're going to put it back on top.
  12. Spoon the melted marshmallow into the holes.  You may need to reheat the marshmallow as you do this because it gets stickier as it cools and is difficult to get off the spoon.
  13. Put the cake 'stopper' back into the cake on top of the marshmallow.
  14. Leave to cool while you make the topping (see below).
Marshmallow Fluff Topping (with drizzled chocolate) - adapted from Bake me I'm yours...Sweet Bitesize Bakes
 
  • 1 large egg white
  • 125g/4.5oz caster sugar
  • 25g/0.75oz golden syrup
  • pinch of salt
  • 1/4 tsp cream of tartar
  • 1 tbsp water
  • 1 tsp vanilla extract
  • About 40g milk chocolate
  1. Put a heatproof bowl over a saucepan of simmering water.
  2. Place everything except the vanilla extract in the bowl.
  3. Whilst it is heating, stir with an electric whisk for several minutes (about 10) until you get shiny peaks.
  4. Remove from the heat and whisk for another two minutes to thicken it up.  
  5. Add the vanilla and whisk in too.
  6. Allow to cool.
  7. Spoon into a piping bag fitted with a large star nozzle and pipe large swirls on top of each cake.
  8. Melt the chocolate in a glass bowl over a pan of simmering water.
  9. Spoon the chocolate into a piping bag fitted with a small, round nozzle.  Pipe spirals on top of the marshmallow fluff.