Showing posts with label fondant. Show all posts

Friday, 8 August 2014

Neapolitan Stacked Book Wedding Cake


This is going to be a long one, folks.  This cake took 2 days to make and decorate after all.

Well.  This year certainly has been busy, something a lack of posts can testify to.  I completed a post-graduate course in Primary Education and as a result will be starting a new job as a primary school teacher in a little over a week.  Admittedly, that means next year is going to be busy too but hopefully in a more manageable way because there is no erratic schedule to deal with (and no essays too I hope).  But university was not the only thing demanding my attention.  Oh no.  We had also decided that this would be a good year to get married.  As if there wasn't enough work to do!  Especially since we were planning to do a lot of things ourselves to save money.  And by 'we' I mean 'me' because I'm a control freak and didn't want to let anyone help me.

All that work culminated on July 27th and I am now married to the fiancé!  Well, he's earned an upgrade now so henceforth he is the Husband.  Or Hubby....hmm.  Possibly both.  I like both.  The wedding was just perfect.  The food was amazing!  So so good!  And there was much ceilidh dancing, even if some people never joined in!  As far as I understand it, everyone had a good time.

But your not here for the wedding.  Well, you are but it's a specific part.  A very important part.  One of those jobs I decided to take upon myself.  My pride as a baker demanded it!  As did the fact that I'm rather picky about my desserts.  And because we wanted to save money wherever we could.  You're here for the wedding cake! 


The wedding cake was the absolute last thing that had to be done before the wedding because we wanted it to be as fresh as possible on the day.  This wouldn't have been much of an issue if it had been a traditional fruit cake.  Those things keep well apparently.  Trouble is, we hate fruit cake.  So we had had a different plan.  We decided we wanted to have three tiers to our cake, but each would be a different flavour: vanilla, chocolate and strawberry.  Not only was it slight nod to the Hubby's Italian ancestry, but it would also mean that there would be something that everyone would like (with the exception of people like my brother who do not like cake at all), including us.  But, like I said, they would not keep as well as fruit cake so it had to be a day before thing.  Admittedly, yes, I could have made them earlier, frozen them and got them out the day before to decorate but 1) there was no room in the freezer due to space being taken up by the 460 biscuits I had made for favours and 2) I wouldn't be able to freeze any leftovers after the wedding.  And there would be a lot of leftovers because this cake is big.  Much bigger than our small wedding needed but when I think wedding cake I think big.  So big it was.

The plan was simple.  I would bake all the cakes on Friday.  I would then decorate and stack the cakes on Saturday, in between going to lunch with my family, who were travelling up from England, and looking after Jess when she was dropped off at my flat in the evening.  For the most part, this plan was fairly successful.  The only hiccup was that I slightly underestimated my amounts when scaling my recipes for each cake.  I had initially planned for two layers per cake, but they ended up a bit thin and I had to make extra.  Hence why the vanilla and strawberry cakes have 3 layers rather than 2.  I readjusted my estimates for the chocolate one before I attempted to bake it and they turn out fine.  At least I had bought plenty of ingredients, with the exception of strawberries.  The Hubby had to be sent out to the shops on Saturday morning for more before I could make the final strawberry layer.


So there are 8 layers spread amongst three tiers in this cake.  And all 8 layers were baked in one tin, one at a time (with the exception of the strawberry because they were smaller) because my oven is tiny.  Once again, I will need to gush about how much I love my Alan Silverwood Multisize Foldaway Cake Pan.  It is the most fabulous cake tin!  I can use it to make cakes of all sizes (such as all three sizes for this wedding cake) and it stores flat so it does not take up space in my cupboard.  AND, because it can be taken apart, removing the cakes from it is ridiculously easy.  The only thing you have to be careful of is making sure all the edges are well covered in parchment as the inside dividers have slats on the base to help them fit together and if you are not careful, batter will escape.  The pan did a great job with all my cakes.  I am so grateful I had it.  Aside from that slight hiccup I mentioned, the baking went well.  I had not really been worried about the baking.  It was the decorating that I was dreading.

Whilst I will always appreciate a beautifully decorated cake, I find I often have little patience for anything overly fiddly.  I like things simple.  The original plan for the wedding cake was simple.  Basic covering of fondant and then maybe some flair added through stripes, textures and very simple icing work.  However, about 2 months before the wedding I had a thought.  Said thought had stemmed from a discussion with the Hubby about what our wedding topper should be.  We'd been entertaining the idea of chess pieces at the time but then it was suggested (I forget who by) that we have penguins.  Specifically, the penguins featured on our invitations which I had made to imitate Penguin Classics books.  It seemed perfect and tied in wonderfully, though it added to my list of jobs as I was the one who was going to make them.

But with penguins for toppers and a book theme to our invitations I started thinking 'what about books for our wedding cake?'  It could be a stack of white books.  In theory it wouldn't be much harder than the original plan.  It was still basically an all over cover job with fondant.  I would just have to do some things a bit different.  It didn't seem like it would be too hard but just in case, I kept it secret from most people.  That way, if it didn't work out, I could go back to the first plan and no one would be any the wiser.  Sneaky, I know.


I admit, I have forgotten how frustrating fondant can be.  Despite my best efforts and liberal applications of icing sugar it would stick to EVERYTHING except the cake.  And it would stretch out of shape after I had cut it to size so in the end I just got it roughly the size and shape I wanted and then trimmed it once it was in place on the cake.  This was trickiest on the sides but I managed.  Once I was able to complete the first tier, the others did not look as daunting and, whilst not perfect, the effect looked rather good.

The bottom tier was by far the best.  I really should have cut the other two so they were flat.  The curving on the chocolate cake meant the strawberry didn't sit properly on it when stacked and I was annoyed with it for ages.  However, I was impressed that I managed to stack it at all (having never done it before) and it stayed intact on the journey between the flat and the hotel.  Having never stacked a tiered cake before I had been fearful it would get damaged in transit.  But nope!  It made it all the way.  And then the hotel did an excellent job of presenting it on the actual day, making it look like the slanted placement was deliberate.  So I was much happier with it after that.    As I said, it was by no means perfect.  The finishing could be smoother but hey, I'm not a professional cake decorator.  I loved it and everyone thought it looked good too (though obviously they have to be nice to me because I was the bride).

But you know me.  I am always concerned about taste as well as appearance.  I was so anxious when it was finally served during the reception.  There was a lot more than necessary so there was plenty of choice.  And clearly all flavours were enjoyed as many people tried all three and went back for more.  I only had the vanilla but it was the BEST vanilla cake I have ever made.  All those vanilla beans really improved the flavour.  According to the Hubby, the strawberry cake tasted much more of strawberries this time around and the chocolate cake was wonderfully fudgy.  All in all, I was pleased and proud of this cake.  It looked good and it tasted good!  I couldn't really ask for more.  And there were plenty of leftovers which have gone into the mother-in-law's freezer, so that's a bonus! 


Recipe:
Serves 226 (1x1inch slices) or 113 (1x2inch slices) 


Bottom Tier - Vanilla Bean - adapted from The Good Food Channel:
  • 12 eggs (approximately 750g/26.5oz)
  • Caster sugar equal to the weight of 12 eggs in their shells
  • Salted butter equal to the weight of 12 eggs in their shells
  • Self-raising flour equal to the weight of 12 eggs in their shells
  • 4.5 vanilla beans
  • 1.5 tsp vanilla extract
  1. Preheat the oven to 180°C/350°F/Gas Mark 4.
  2. Grease and line three 30x23cm (12x9inch) cake tins with baking parchment. (You can do this with one tin, you'll just have to bake each layer one at a time). 
  3. Separate the eggs and whisk the egg whites until they reach the soft peak stage.
  4. Remove the seeds from the vanilla beans. 
  5. Put the butter, sugar and vanilla seeds into a large bowl and beat until really pale and fluffy. 
  6. Whisk the egg yolks and vanilla extract together and add to the butter mix a little at a time, folding it in to add air to the mixture.
  7. Sift in the flour and fold that in also.
  8. Add the egg whites and fold those in too until you cannot see any white in the mixture.
  9. Pour one third of the mixture into each tin and use a spatula to make sure it is evenly spread. (If using one tin, cover the rest of the batter with clingfilm between bakes).
  10. Bake each layer in the oven for about 1 hour.  The sponge should be springy to the touch and a skewer inserted into the centre should come out clean.
  11. Allow to rest in the tins for about 10 minutes before turning out onto a wire rack and removing the paper.  Leave to cool completely.

Middle Tier - Chocolate - adapted from Mary Berry's Baking Bible:
  • 115g/4oz cocoa powder
  • 12 tbsp boiling water
  • 6 eggs
  • 100ml/3.5fl.oz whole milk
  • 350g/12oz self-raising flour
  • 2 tsp baking powder
  • 200g/7oz salted butter
  • 550g/20oz caster sugar
  1. Preheat the oven to 180°C/350°F/Gas Mark 4 and grease and line two 25x18cm/10x8inch cake tins with baking parchment. (Or one tin and then do it again for the second layer).
  2. In a large bowl, combine the cocoa powder and the water into a paste.
  3. Add the rest of the ingredients and beat the mixture until it becomes smooth and thick.
  4. Divide equally between the two cake tins and smooth the surface.
  5. Bake for about 45 minutes, or until risen and a skewer inserted into the centre comes out clean.
  6. Allow to rest in the tins for a few minutes before turning out onto a wire rack, removing the parchment and leaving to cool completely.

Top Tier - Strawberry - adapted from Smitten Kitten:
  • 370g/13oz plain flour
  • 60g/2oz cornflour
  • 400g/14oz caster sugar
  • 3.5 tsp baking powder
  • 225g/8oz slightly salted butter
  • Approximately 350g/12oz strawberries
  • 6 egg whites
  • 120ml/4fl.oz whole milk
  • A couple of drops of pink food gel (optional)
  1. Preheat the oven to 180°C/350°F/Gas Mark 4 and grease and line three 20x15cm/8x6inch cake tins (again, it is possible to do this one at a time with one tin).
  2. Sift the plain flour and cornflour together into a large bowl, add the sugar, baking powder and salt and give everything a good mix.  
  3. Purée the strawberries and add them and the butter to the dry ingredients and beat until light and fluffy.
  4. In a separate bowl beat the egg whites with the food gel (if using).
  5. Add the egg whites a little at a time to the batter, beating after each edition until just incorporated.
  6. Divide the mixture between the pans.
  7. Bake for at least 35 minutes but cakes may take as long as 50 minutes.  Cakes should be risen, springy to the touch and a skewer inserted into the middle should come out clean.
  8. Allow to rest in the pans for about 15 minutes, then turn out onto a wire rack to finish cooling.  Cool completely before frosting.

Vanilla Buttercream:
  • 250g/9oz salted butter
  • 500g/18oz icing sugar
  • 2 tbsp whole milk 
  • 2 tsp vanilla extract
You will need to make two batches of this.  One batch is enough for the bottom tier whilst the other batch does both the middle and top tiers.  It's just easier to do it as two as it is easier to divide up the mixture, and puts less pressure on your mixer.
  1. Beat the butter until it is very pale and creamy.
  2. Sift in the icing sugar and add the milk and vanilla extract.
  3. Beat the ingredients together until well combined and you get a smooth buttercream. 


Decoration:
  • 4kg/9lbs ready to roll fondant icing
  • 1 jar of strawberry jam
  • Gold lustre dust (optional)
  • Cold water
  • Icing sugar
  • Cake boards (one thick 12x12inch, one thin 10x10inch, one thin 8x8inch)
  1. Cut the two thin cake boards to match the dimensions of the middle and top tiers of cake.  Set aside.
  2. Dust a cool surface with plenty of icing sugar and roll out about 500g fondant icing into a rectangle that is just slightly bigger than the base area of the bottom tier.
  3. Place icing rectangle onto the centre of the 12x12inch cake board.
  4. Place one layer of vanilla cake on top of the icing rectangle so that one long edge of cake is lined up exactly with one long edge of icing.  The rest should poke out like the cover of a book.
  5. Coat the top of the cake layer with 1/4 of the first batch of vanilla buttercream, leaving a slight border around the edge. 
  6. Coat the underside of another cake layer with jam and then sandwich on top of the first layer, jam side down.
  7. Repeat steps 5 and 6 with the third layer.
  8. Reserve slightly less than half of the remaining buttercream and then use the rest to thickly cover the top of the third layer.
  9. Measure the height of the cake.  Roll out and cut three rectangles of fondant.  Two will be for the short sides of the cake and one for one of the long sides.  I recommend making them slightly bigger because fondant can stretch out of shape and I found it easier just to trim it once I had it where I wanted.
  10. Cover the sides of the cake in the remaining buttercream and use it to help fix the fondant to the cake.  Trim any excess.
  11. Use a tiny bit of water to fuse the joins at the corners together.
  12. Use a straight edged object, like a clean ruler, and press lines into the covered sides to create the effect of pages.
  13. Now you need to roll out a piece of fondant big enough to cover the top of the cake, with a slight overhang, and the remaining long side.
  14. Gently lay over the top and down the side of the cake and press into place.  Trim off unwanted excess.
  15. Use a dowel rod to make an indentation about 1inch in from the the book's 'spine' on the top of the icing.
  16. If you want, you can use a lustre dust mixed with a tiny bit of water to paint decoration onto the book.  You can also use fondant to make raised decoration, like book seals, spine decoration and bookmarks.  Patterned rolling pins can be used to add some texture.
  17. The steps for the middle and top tiers are practically the same.  However, the filling for the chocolate cake is just buttercream, no jam.  Also, I did not put fondant on the thin cake boards.  I added the 'bottom cover' of the books after they were stacked.
 

Assembly:
  • White plastic dowel rods
  • Some fondant icing
  • Cold water
  • Icing sugar
  1. Place a dowel rod into the centre of the bottom tier, pushing it all the way through.  
  2. Mark where the top of the cake meets the dowel rod and remove.
  3. Cut the dowel rod to size.  This can be done by sawing through it with a serrated knife.
  4. Cut about 8 dowel rods to the same size.  You can cut more if you want.
  5. Place these into the bottom tier within the area you want the middle tier to sit.  
  6. Dust the area with icing sugar.
  7. Place the middle tier on top of the dowelled area.
  8. Dowel the middle tier in the same manner as the bottom tier.  You can use fewer dowels as the top tier is not as heavy.
  9. Sharpen the end of a dowel rod that is equal to the height of all the cakes and push it through the top tier, through the cake board and into the middle tier, through the second cake board, through the bottom tier until you hit the cake board at the base.  If you don't have a long enough dowel (I didn't) do this once for the bottom and middle tiers and again for the top and middle tiers.
  10. Cover the hole the dowel made in the top tier with fondant, using a little water and icing sugar to hide the patch.  If you want to be fancy, you could make a little 'cover' decoration to hide the dowel.  Otherwise, if you are having a topper that can also disguise the patch.

Wednesday, 27 March 2013

Cadbury's Creme Egg Cupcakes

 
There are a lot of posts to get done this week.  So far, I've got four to do including this one but since I've been asked to make something for Easter lunch on Sunday there'll be five in total.  Best get a move on.

I shall start the updates with the usual Monday cupcake bake for the fiancé to take with him when he goes to Dundee.  As has been the case over the last few weeks, I once again had not given much thought to what I wanted to make until the night before.  Since Easter is coming up I wanted to do something along that theme as next week there are no cupcakes to take since the fiancé is going there straight from work.  I found my inspiration on Pinterest.  Completely by accident mind as I wasn't even browsing the Food category.  Creme Egg cupcakes!  However, the recipe linked used actual Creme Egg filling in the icing.  Well, you know me: I like making everything from scratch.  So off I went in search of a copy-cat recipe for the fondant, which I eventually found on Sticky Pinny.  In fact, she had an entire Creme Egg cupcake recipe right there which looked very cool.  The overall appearance of them was awesome.  I didn't want to do it like that though.  I wanted to put my fondant inside a chocolate cake, not on top, so it would be like an actual Creme Egg.  I also steer clear from cream cheese frostings, since the fiancé hates cheese (though I will tackle them one of these days), and I preferred to try and make the cake taste as much like Cadbury Dairy Milk as I possibly could and so didn't want to use the Devil's Food Cake base either.  

Hence I went searching for a different cupcake recipe to use as a base.  My main requirement was that it used actual chocolate in the recipe, not cocoa powder.  I then had a brainwave!  If I could find a recipe that also used a good amount of milk, I could put the Cadbury's drinking chocolate powder in it and make milk chocolate milk!  With those two conditions in mind I did eventually find one that I liked the look of.  I found it on GoodToKnow, but it comes from the Primrose Bakery.

The final thing to decide on was the topping but eventually I settled on milk chocolate buttercream, also flavoured with Dairy Milk.  So from the outside it just looks like a chocolate cake but then you bite into it and find the gooey egg centre.

They were quite the success indeed!  My tasters said they tasted just like Creme Eggs but in cake form.  The cake and buttercream tasted like Dairy Milk and the filling like Creme Egg filling.  However they were quite a heavy cake and the fiance said the buttercream is so indulgent that they could only manage to eat one each.  I personally did not think the filling tasted like Creme Eggs.  It was almost too sweet and I could taste the golden syrup in it.  But that's just me apparently.


Recipe - makes 15

Cakes - recipe adapted from the Primrose Bakery via GoodToKnow:
  • 250ml semi-skimmed milk
  • 1 x 11g packet Cadbury's Highlights Chocolate Instant
  • 1/2 tsp vanilla extract
  • 115g/4oz Cadbury's Dairy Milk chocolate
  • 85g/3oz unsalted butter
  • 175g/6oz dark brown sugar
  • 2 large eggs
  • 185g/6.5oz plain flour
  • 3/4 tsp baking powder
  • 3/4 tsp bicarbonate of soda
  • Pinch of salt
  1. Preheat the oven to 190°C/375°F/Gas Mark 5 and line 15 holes of muffin tins with muffin cases.
  2. Put the milk in a jug and stir in the packet of Cadbury Highlights until it dissolves.  
  3. Stir the vanilla into the milk and then set aside.
  4. Melt the chocolate in a heatproof bowl over a saucepan of gently simmering water.  Leave to cool slightly.
  5. Beat the butter and sugar together in a large bowl until it is pale and creamy.
  6. Separate the eggs, putting the yolks and whites into different bowls.
  7. Beat the yolks for a few minutes and then add to the sugar butter a little at a time, beating in after each addition.
  8. Stir in the melted chocolate.
  9. Sift the flour, baking powder, bicarbonate of soda and salt together into a bowl.
  10. Add the flour mix to the cake batter, alternating it with the milk and stirring in after each addition.  
  11. Whisk the egg whites into soft peaks and then slowly fold into the cake mixture.  Keep folding until you see no bits of white.  The resulting mixture will be runny but smooth.
  12. Fill the cases three quarters full with the mixture and then bake for 20-25 minutes until risen and tops are springy. 
  13. Leave in the tins for 10 minutes before transferring to a wire rack to finish cooling.

Fondant Filling - adapted from Sticky Pinny:
  • 170g/6oz golden syrup
  • 60g/2oz butter
  • 375g/13oz icing sugar
  • 1 tsp vanilla extract
  • 1/4 tsp salt
  • 1 tbsp water
  • Yellow/orange and white food colouring gel/powder
  1. Beat the golden syrup, butter and icing sugar together in a bowl with an electric whisk until smooth.
  2. Add in the vanilla extract, salt and water and mi until well incorporated.
  3. Transfer a third of the mixture to a different bowl and colour with the yellow/orange food colouring to it.
  4. Use the white colouring on the remaining two thirds.  You don't need to make it completely white, just noticeably paler than the yellow.
Buttercream:
  • 175g/6oz butter
  • 340g/12oz icing sugar
  • 150g/5.3oz milk chocolate
  • 1 tbsp milk
  1. Melt the chocolate in a heatproof bowl placed over a saucepan of gently simmering water.
  2. Beat the butter until it is really creamy.
  3. Sift in the icing sugar, add the milk and beat until smooth.
  4. Pour in the chocolate and beat until evenly distributed through the mix.
Assembly:
  1. Use a knife and cut a core out of the middle of each cupcake.
  2. Put a small amount of yellow fondant into the hole you have made then fill in the rest with white fondant.
  3. Replace the core.
  4. Put the buttercream in a piping bag fitted with a large star nozzle and pipe a swirl on top of each cake.  Make sure to cover the entire top and mask the seams of the core and any filling that may have escaped.

Saturday, 3 November 2012

Poison Caramel Apple Cupcakes


So here is the final batch of cakes I made for Halloween.  Inspired by a traditional Halloween sweet: caramel apples.  They are an apple and cinnamon sponge, with a caramel centre, a thin layer of caramel on top and then a layer of fondant painted to look like an apple.  I admit, I wasn't sure if anyone would like them, especially as the topping ended up being quite gooey and a bit messy.  But everyone who has eaten one really enjoyed them.  Of the ones I made for the trick-or-treaters, these are the fiancé's favourite.

The sponge for these cakes came from an American recipe, which was all measured in cups.  I also did my measuring in cups this time around because I was tired and did not want to convert them all. I will convert in the write-up though.


Recipe - adapted from Group Recipes
Makes about 15
  • 2-3 Granny Smith apples 
  • 260g/9oz plain flour
  • 100g/3.5oz caster sugar
  • 1 tsp ground ginger
  • 1 tsp ground cinnamon
  • 1/8 tsp ground nutmeg
  • 1 tsp bicarbonate of soda
  • 1/4 tsp salt
  • 2 large eggs
  • 170g/6oz oil (I used rapeseed)
  • 60ml/2fl.oz apple juice
  • 1 tsp vanilla extract
  • 1 x 397g tin Carnation Caramel
  • 200g/7oz ready-to-roll icing
  • Red and green food colouring
  • Icing sugar 
  1. Preheat the oven to 180°C/350°F/Gas Mark 4 and line a 12 hole and a 6 hole cake tin with 15 cupcake cases.
  2. Rinse and core the apples, put on a baking tray and put in the oven to cook until soft.  This takes about 30 minutes.
  3. Remove, allow to cool and then peel off the skin.  Do not turn off the oven.
  4. Put the remains in a bowl and mash them into a pulp with a fork.  Leave to one side to cool.
  5. In a large bowl, combine the flour, sugar, ginger, cinnamon, nutmeg, bicarbonate of soda and salt and mix together.
  6. Break the eggs in a separate bowl and beat.  Add the oil, apple juice, vanilla extract and cooled apple pulp and mix together.
  7. Add the wet ingredients to the dry and mix until everything comes together in a smooth batter.  
  8. Spoon into the cases, trying to spread the mixture evenly.
  9. Bake for about 20 minutes, until risen and a skewer inserted into the centre comes out clean.
  10. Leave on a wire rack to cool.
  11. Once cool, use an apple corer or a knife to make a hole in the centre of the cakes.  Be sure to keep the cores.
  12. Open the tin of caramel and put 3 tablespoonfuls into a small bowl.  Mix until smooth and runny.
  13. Fill the holes with the runny caramel and then remove the top of each core and use them to plug up the cakes.
  14. Using a knife or small spoon, spread a thin layer of caramel from the tin (where it won't be runny) over the top of each cake.
  15. Reserve a small part of the fondant icing for making leaves and stems.  Use the red food colouring to colour the rest of the fondant red.  The addition of colour will make it sticky so knead it in icing sugar to stop this from occurring.
  16. Break off some fondant and roll in out into a square that is bigger than one the cakes.
  17. Drape the fondant over the top and smooth down to the edge of the cake.
  18. Press your finger along the edge of the case to cut through the fondant for a smooth finish.  Gently make an indent in the centre of the fondant with your finger to give the illusion of the top of an apple.
  19. Using a clean paintbrush dipped in green food colouring, paint strips of colour from the centre of the cake to the edge.  Try to make your brush strokes as quick as possible to get the right texture.
  20. Use another paintbrush to do the same with the red food colouring.
  21. Colour the remaining food colouring with green food colouring (add a touch of red if you want a brown colour).  
  22. Break off small pieces and shape into stalks and gently push them into the indent in the middle of the cakes.
  23. Shape the rest into leaves, scrunching them slightly to make them look like they are dying.  Set atop the cakes, with one pointed end next to the stem.
  24. Leave the fondant to dry before putting them in a tin.

Thursday, 1 November 2012

Marshmalloween Ghost Cupcakes


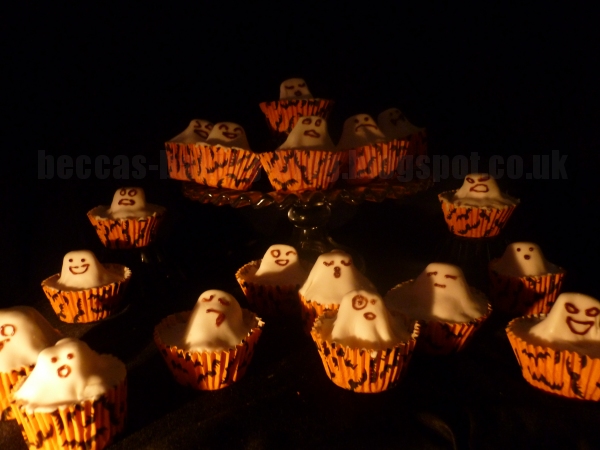
These are my favourite cakes out of the ones I made for Halloween, both in terms of taste and looks.  They just came out so cute!  And vanilla, marshmallow and fondant is a wonderfully sweet combination.  I kept most of these for myself, rather than taking them to work.  I took four into my work and gave none to the fiancé.

So these ones are a vanilla cake, with a marshmallow centre.  They were then topped with a marshmallow and covered in a layer of ready-to-roll fondant to look like little ghosts.  I was quite proud of them, since I was pretty much making it up as I went along.  I even made vanilla buttercream to use for sticking the fondant on but then had so much melted marshmallow left over that I ended up using that instead, and really, I think that was the better option.  I had a much easier time putting the marshmallow in this time around.  I don't know if it was because I used bigger marshmallows or a bigger pan and bowl for melting.  Whatever I did, it made my life easier.

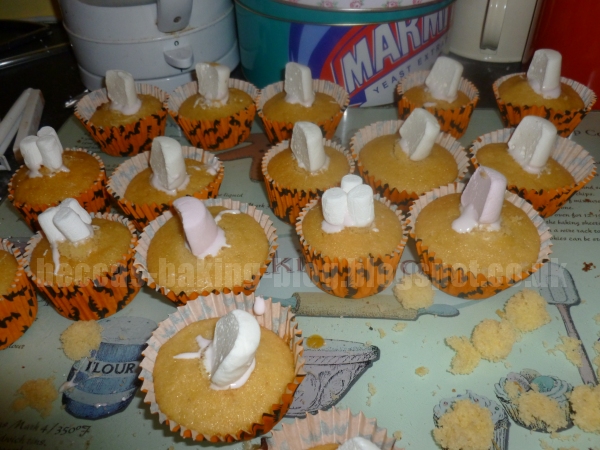
In the recipe write up, I'm going to do something I've not done before, which is post pictures of some of the decorating process, since I took some photos as I was doing it.  Admittedly not the best photos because the light wasn't that great but hopefully still helpful.


Recipe - makes 18
  • 150g/5oz butter
  • 150g/5oz caster sugar
  • 1 tsp vanilla extract
  • 3 eggs
  • 175g/6oz self-raising flour
  • 200g/7oz bag of large marshmallows
  • 300g/10.5oz ready-to-roll fondant icing
  • Chocolate flavoured writing icing
  1. Preheat the oven to 180°C/350°F/Gas Mark 4 and line a 12 hole cake tin and a 6 hole cake tin with cases.
  2. Cream the butter and sugar together in a large bowl until pale and fluffy.
  3. Add the vanilla extract and beat in.
  4. Add the eggs one at a time, and beat until fully incorporated after each addition.
  5. Sift in the flour and fold into the mixture.
  6. Spoon into the cases, trying to distribute the mixture equally.
  7. Bake for about 20 minutes.  The cakes should be risen and golden, and a skewer inserted into the centre should come out clean.
  8. Leave to cool on a cooling rack.

  1. Melt the marshmallow while you wait.  Count out 9 large marshmallows and put to one side.  Put the rest into a large glass bowl set above a pan of simmering water.  Don't let the bowl touch the water.  You will want to keep the bowl warm after all the marshmallow has melted because if it is allowed to cool too much, it becomes hard to work with.
  2. When the cakes have cooled, use an apple corer or a knife to carve a hole in the centre of a cake.  Do not get rid of the cake 'core' you removed.
  3. Fill the hole with melted marshmallow.
  4. Cut the top off the 'core' and put this top back into the top of the cake to cover the marshmallow. 
  5. Cut the remaining marshmallows in half, dab the base in melted marshmallow and use it to stick them to the centre of the top if the cakes.
  6. Drizzle the remaining melted marshmallow around the edges of the cake.
  7. Knead the fondant until pliable and then roll out small amounts into thin squares that are bigger than the cakes.
  8. Drape the fondant over the marshmallow and gently push down to cover the cake.
  9. Press your finger around the fondant against the edge of the cake case and it should cut through the icing, giving you a smooth finish.
  10. Use the writing icing to pipe faces on the wider side of the ghosts.

Monday, 29 October 2012

Gingerdead Cupcakes


The next couple of days are going to be quite busy baking wise.  I have four different batches of cakes to make for Hallowe'en.  All cakes were baked today and the majority will be decorated tomorrow evening.  However, one set is for the fiance to take to Dundee tomorrow so they had to be finished today.  

So these cakes came from a book I picked up a few weeks ago and after perusing it, I asked the fiancé if he would like these cakes for to take for Hallowe'en.  He jumped on the idea.  Chocolate cake with chocolate buttercream and gingerbread gravestones.  Fairly easy and yet surprisingly effective.  And fun to photograph too.  I had fun playing with the lighting.

I only made two modifications to the recipe.  The first was to leave out the espresso coffee because I didn't want that to come through in the cakes.  At the very least the fiancé doesn't like coffee and I want him to enjoy them.  The second was using lemon extract instead of lemon zest for the gingerbread.  I will also note that the amount of gingerbread that resulted from the recipe was far too much for making 12 graves.  So I ended up with a few spare graves (in case any broke in assembly) and nearly two dozen gingerbread bats.  I figure I'll keep them to hand out to trick-or-treaters.  Hence in the write-up, I'm going to halve the gingerbread recipe.


Recipe - adapted from A Zombie Ate My Cupcake
Makes 12

Gingerbread:
  • 225g/8oz plain flour
  • 1/2 tsp bicarbonate of soda
  • 1 tsp ground ginger
  • 3/4 tsp ground cinnamon
  • 1/2 tsp ground nutmeg
  • 1/8 tsp salt
  • 60g/2oz unsalted butter
  • 50g/1.75oz granulated sugar
  • 80ml/2.8fl.oz black treacle
  • 1 small egg
  • 3/4 tsp lemon extract
  1. Sift together the flour, bicarbonate of soda, spices and salt.
  2. In a large bowl, beat the butter and sugar together until light and fluffy.
  3. Add the egg and the treacle and mix until thoroughly combined.
  4. Add the lemon extract and mix in. 
  5. Gradually add the flour a bit at a time, mixing until fully incorporated before adding more.  You may need to use your hands for the last of it as you end up with quite a thick dough.
  6. Split the dough in two, shape into balls and wrap each ball in clingfilm.  Put in the fridge to rest for about 3 hours.
  7. Preheat the oven to 180°C/350°F/Gas Mark 4 and line 2-3 baking trays with greaseproof paper.
  8. Remove the dough from the fridge and let it sit for about 5 minutes.  Meanwhile lightly flour your work surface and rolling pin.
  9. Roll the dough out to be about 5mm/0.25inches thick and then cut out gravestone shapes with a knife.  Transfer each shape to a tray, spacing the biscuits about 1 inch apart.  You need 12 gravestones but it's worth making a couple of spares in case any break.  Remember not to make them too big or they won't fit in the cakes.
  10. Bake for about 10 minutes before removing from the oven and leaving to cool on a wire rack. 

Cakes:
  • 60g/2oz butter
  • 140g/5oz caster sugar
  • 1 large egg
  • 1/2 tsp vanilla extract
  • 115g/4oz plain flour
  • 30g/1oz cocoa powder
  • 1/4 tsp bicarbonate of soda
  • 1/4 tsp salt
  • 80ml/2.8fl.oz sour cream (or sour cream substitute)
  1. Preheat the oven to 180°C/350°F/Gas Mark 4 and line a 12 hole muffin tin with cases, preferably black or dark brown.
  2. Cream the butter and sugar together until very pale and fluffy.
  3. Add the egg and vanilla and beat until well incorporated.
  4. In a separate bowl, combine the flour, spices, bicarbonate of soda and salt by sifting them together.
  5. Add 1/3 of the dry ingredients to the cake batter and mix in thoroughly.
  6. Add half the sour cream and mix.
  7. Now add half of what is left of the dry ingredients and mix.
  8. Add the rest of the cream and mix.
  9. Add the last of the dry ingredients and blend together well.
  10. Spoon equal amounts of batter into the cases and then bake in the oven for 15-20 minutes, until a skewer inserted into the middle comes out clean.
  11. Cool on a wire rack before decorating.

Buttercream:
  • 60g/2oz unsalted butter
  • 30g/1oz cocoa powder
  • 1/3 tsp salt
  • 1/2 tsp vanilla extract
  • 250g/8.8oz icing sugar
  • 2 tbsp milk
  • 2 tbsp double cream
  1. Beat together the butter and cocoa powder until smooth and creamy.
  2. Add the salt, vanilla extract, icing sugar and milk and beat until well incorporated.
  3. Add the cream and mix in until smooth.
 Assembly:
  • A small amount of white ready to roll fondant / 12 ready-made fondant flowers
  • White writing icing/chocolate
  • 2 tbsp cocoa powder
  1. Spread about 2 heaped teaspoons of buttercream onto each cooled cupcake and smooth to the edges with a spoon.
  2. Set the cakes on a sheet of baking parchment and use a sieve to dust with icing sugar.  Try to cover all the buttercream.
  3. Use the writing icing to decorate the gingerbread gravestones and then push one into the middle of each of the cakes.  They should stand on their own.
  4. If using ready to roll fondant, use a small flower cutter to make little fondant flowers.  
  5. Place the flowers on top of the cocoa covered buttercream.