Showing posts with label halloween. Show all posts

Saturday, 3 November 2012

Poison Caramel Apple Cupcakes


So here is the final batch of cakes I made for Halloween.  Inspired by a traditional Halloween sweet: caramel apples.  They are an apple and cinnamon sponge, with a caramel centre, a thin layer of caramel on top and then a layer of fondant painted to look like an apple.  I admit, I wasn't sure if anyone would like them, especially as the topping ended up being quite gooey and a bit messy.  But everyone who has eaten one really enjoyed them.  Of the ones I made for the trick-or-treaters, these are the fiancé's favourite.

The sponge for these cakes came from an American recipe, which was all measured in cups.  I also did my measuring in cups this time around because I was tired and did not want to convert them all. I will convert in the write-up though.


Recipe - adapted from Group Recipes
Makes about 15
  • 2-3 Granny Smith apples 
  • 260g/9oz plain flour
  • 100g/3.5oz caster sugar
  • 1 tsp ground ginger
  • 1 tsp ground cinnamon
  • 1/8 tsp ground nutmeg
  • 1 tsp bicarbonate of soda
  • 1/4 tsp salt
  • 2 large eggs
  • 170g/6oz oil (I used rapeseed)
  • 60ml/2fl.oz apple juice
  • 1 tsp vanilla extract
  • 1 x 397g tin Carnation Caramel
  • 200g/7oz ready-to-roll icing
  • Red and green food colouring
  • Icing sugar 
  1. Preheat the oven to 180°C/350°F/Gas Mark 4 and line a 12 hole and a 6 hole cake tin with 15 cupcake cases.
  2. Rinse and core the apples, put on a baking tray and put in the oven to cook until soft.  This takes about 30 minutes.
  3. Remove, allow to cool and then peel off the skin.  Do not turn off the oven.
  4. Put the remains in a bowl and mash them into a pulp with a fork.  Leave to one side to cool.
  5. In a large bowl, combine the flour, sugar, ginger, cinnamon, nutmeg, bicarbonate of soda and salt and mix together.
  6. Break the eggs in a separate bowl and beat.  Add the oil, apple juice, vanilla extract and cooled apple pulp and mix together.
  7. Add the wet ingredients to the dry and mix until everything comes together in a smooth batter.  
  8. Spoon into the cases, trying to spread the mixture evenly.
  9. Bake for about 20 minutes, until risen and a skewer inserted into the centre comes out clean.
  10. Leave on a wire rack to cool.
  11. Once cool, use an apple corer or a knife to make a hole in the centre of the cakes.  Be sure to keep the cores.
  12. Open the tin of caramel and put 3 tablespoonfuls into a small bowl.  Mix until smooth and runny.
  13. Fill the holes with the runny caramel and then remove the top of each core and use them to plug up the cakes.
  14. Using a knife or small spoon, spread a thin layer of caramel from the tin (where it won't be runny) over the top of each cake.
  15. Reserve a small part of the fondant icing for making leaves and stems.  Use the red food colouring to colour the rest of the fondant red.  The addition of colour will make it sticky so knead it in icing sugar to stop this from occurring.
  16. Break off some fondant and roll in out into a square that is bigger than one the cakes.
  17. Drape the fondant over the top and smooth down to the edge of the cake.
  18. Press your finger along the edge of the case to cut through the fondant for a smooth finish.  Gently make an indent in the centre of the fondant with your finger to give the illusion of the top of an apple.
  19. Using a clean paintbrush dipped in green food colouring, paint strips of colour from the centre of the cake to the edge.  Try to make your brush strokes as quick as possible to get the right texture.
  20. Use another paintbrush to do the same with the red food colouring.
  21. Colour the remaining food colouring with green food colouring (add a touch of red if you want a brown colour).  
  22. Break off small pieces and shape into stalks and gently push them into the indent in the middle of the cakes.
  23. Shape the rest into leaves, scrunching them slightly to make them look like they are dying.  Set atop the cakes, with one pointed end next to the stem.
  24. Leave the fondant to dry before putting them in a tin.

Thursday, 1 November 2012

Marshmalloween Ghost Cupcakes


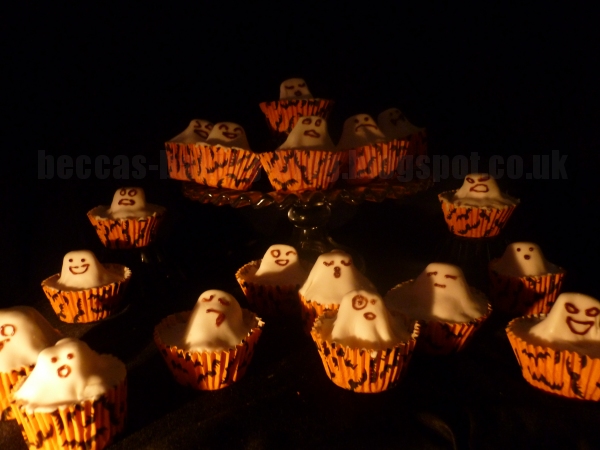
These are my favourite cakes out of the ones I made for Halloween, both in terms of taste and looks.  They just came out so cute!  And vanilla, marshmallow and fondant is a wonderfully sweet combination.  I kept most of these for myself, rather than taking them to work.  I took four into my work and gave none to the fiancé.

So these ones are a vanilla cake, with a marshmallow centre.  They were then topped with a marshmallow and covered in a layer of ready-to-roll fondant to look like little ghosts.  I was quite proud of them, since I was pretty much making it up as I went along.  I even made vanilla buttercream to use for sticking the fondant on but then had so much melted marshmallow left over that I ended up using that instead, and really, I think that was the better option.  I had a much easier time putting the marshmallow in this time around.  I don't know if it was because I used bigger marshmallows or a bigger pan and bowl for melting.  Whatever I did, it made my life easier.

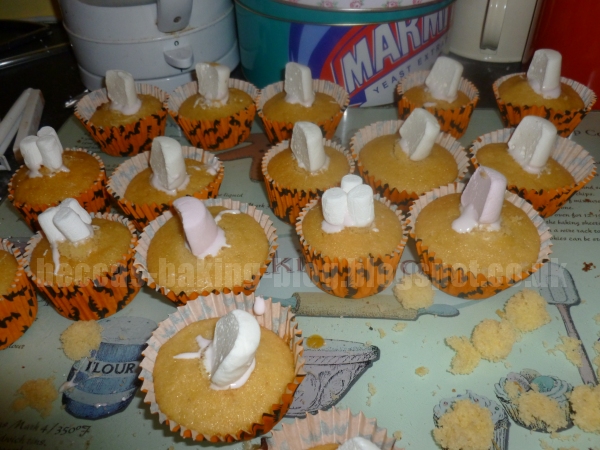
In the recipe write up, I'm going to do something I've not done before, which is post pictures of some of the decorating process, since I took some photos as I was doing it.  Admittedly not the best photos because the light wasn't that great but hopefully still helpful.


Recipe - makes 18
  • 150g/5oz butter
  • 150g/5oz caster sugar
  • 1 tsp vanilla extract
  • 3 eggs
  • 175g/6oz self-raising flour
  • 200g/7oz bag of large marshmallows
  • 300g/10.5oz ready-to-roll fondant icing
  • Chocolate flavoured writing icing
  1. Preheat the oven to 180°C/350°F/Gas Mark 4 and line a 12 hole cake tin and a 6 hole cake tin with cases.
  2. Cream the butter and sugar together in a large bowl until pale and fluffy.
  3. Add the vanilla extract and beat in.
  4. Add the eggs one at a time, and beat until fully incorporated after each addition.
  5. Sift in the flour and fold into the mixture.
  6. Spoon into the cases, trying to distribute the mixture equally.
  7. Bake for about 20 minutes.  The cakes should be risen and golden, and a skewer inserted into the centre should come out clean.
  8. Leave to cool on a cooling rack.

  1. Melt the marshmallow while you wait.  Count out 9 large marshmallows and put to one side.  Put the rest into a large glass bowl set above a pan of simmering water.  Don't let the bowl touch the water.  You will want to keep the bowl warm after all the marshmallow has melted because if it is allowed to cool too much, it becomes hard to work with.
  2. When the cakes have cooled, use an apple corer or a knife to carve a hole in the centre of a cake.  Do not get rid of the cake 'core' you removed.
  3. Fill the hole with melted marshmallow.
  4. Cut the top off the 'core' and put this top back into the top of the cake to cover the marshmallow. 
  5. Cut the remaining marshmallows in half, dab the base in melted marshmallow and use it to stick them to the centre of the top if the cakes.
  6. Drizzle the remaining melted marshmallow around the edges of the cake.
  7. Knead the fondant until pliable and then roll out small amounts into thin squares that are bigger than the cakes.
  8. Drape the fondant over the marshmallow and gently push down to cover the cake.
  9. Press your finger around the fondant against the edge of the cake case and it should cut through the icing, giving you a smooth finish.
  10. Use the writing icing to pipe faces on the wider side of the ghosts.

Chocolate and Worm Cupcakes


The fiancé and I moved into our flat at the end of May and though we've had a flat on our own before, this is the first time we're in the centre of town/the village and therefore a place for trick-or-treaters (or guisers as everyone up here calls them).  We're very close to the local primary school and so there are a lot of kids living around us too.  Hence we figured we should be prepared for them in case any came by, which some might since apparently the fiancé's Mum will be telling her old class that I worked with in the summer that I'm handing out treats.  Now, I could have just gone and bought sweets but where's the fun in that?  So instead I baked three different types of cake, ending up with over 50.  I figured I would rather have too many than not enough.  Unfortunately, I had far too much, as I only got one group of kids at my door.  I was a little disappointed.  I did find out later that some of the kids had misunderstood and gone to the fiancé's Mum's house for cake since I used to live there.  Oh dear.  But my and the fiancé's co-workers all ended up benefiting since we split up the leftovers between us and took them into work today (although I did keep some for myself).

Anyway, on to the first cake of three: Chocolate and Worms.  These are a brownie cupcake with some chocolate buttercream, jelly worms and brownie crumbs on top.  I picked brownie cupcakes because I thought they gave a nice, dirt-like texture.  Originally I wanted to bore holes in the cakes and run the worms through them, but the brownie mix was too crumbly and they fell to pieces.  This is why I also baked them without cases, but I lost a few trying to get them out, so I'm going to suggest making them in cases in the recipe write up.


Recipe - makes about 17 (actually 18 but you need one for crumbling)

Cakes - adapted from 200 Cupcakes
  • 100g/3.5oz milk chocolate chunks/chips
  • 200g/7oz plain chocolate 
  • 150g/5oz lightly salted butter
  • 3 eggs
  • 200g/7oz light muscavado sugar
  • 125g/4oz self-raising flour
  • 1/2 tsp baking powder
  1. Line one 12 hole and one 6 hole cake tray with paper cases and preheat the oven to 190°C/375°F/Gas Mark 5.
  2. In a glass bowl placed above a pan of simmering water, melt together the chocolate and the butter.
  3. In a large bowl, beat together the eggs and sugar.
  4. Stir in the melted chocolate and butter.
  5. Sift together the flour and baking powder and gently fold into the mixture.
  6. Fold in the milk chocolate chunks.
  7. Spoon equal amounts into the paper cases but try not to have any chocolate chunks in the one you will be crumbling for decoration.
  8. Bake for about 12 minutes.  A crust should have formed on top of the cakes but they will still be quite soft underneath.
  9. Allow to cool in the tray for about 10 minutes before transferring to a wire rack.
Topping:
  • 85g/3oz icing sugar
  • 30g/1oz butter
  • 3 tbsp milk
  • 1 tsp vanilla extract
  • 30g/1oz cocoa powder
  • 2 x 100g packets of jelly snakes
  1. Put everything except the snakes in a bowl and beat together until smooth.  
  2. Use a spoon to cover all cakes but one (the one to be crumbled) in a not-too-thick layer of the buttercream.
  3. Put two jelly snakes on top of each cake.
  4. Crumble up the remaining cake and cover any exposed buttercream with a thin layer of the crumbs.

Monday, 29 October 2012

Gingerdead Cupcakes


The next couple of days are going to be quite busy baking wise.  I have four different batches of cakes to make for Hallowe'en.  All cakes were baked today and the majority will be decorated tomorrow evening.  However, one set is for the fiance to take to Dundee tomorrow so they had to be finished today.  

So these cakes came from a book I picked up a few weeks ago and after perusing it, I asked the fiancé if he would like these cakes for to take for Hallowe'en.  He jumped on the idea.  Chocolate cake with chocolate buttercream and gingerbread gravestones.  Fairly easy and yet surprisingly effective.  And fun to photograph too.  I had fun playing with the lighting.

I only made two modifications to the recipe.  The first was to leave out the espresso coffee because I didn't want that to come through in the cakes.  At the very least the fiancé doesn't like coffee and I want him to enjoy them.  The second was using lemon extract instead of lemon zest for the gingerbread.  I will also note that the amount of gingerbread that resulted from the recipe was far too much for making 12 graves.  So I ended up with a few spare graves (in case any broke in assembly) and nearly two dozen gingerbread bats.  I figure I'll keep them to hand out to trick-or-treaters.  Hence in the write-up, I'm going to halve the gingerbread recipe.


Recipe - adapted from A Zombie Ate My Cupcake
Makes 12

Gingerbread:
  • 225g/8oz plain flour
  • 1/2 tsp bicarbonate of soda
  • 1 tsp ground ginger
  • 3/4 tsp ground cinnamon
  • 1/2 tsp ground nutmeg
  • 1/8 tsp salt
  • 60g/2oz unsalted butter
  • 50g/1.75oz granulated sugar
  • 80ml/2.8fl.oz black treacle
  • 1 small egg
  • 3/4 tsp lemon extract
  1. Sift together the flour, bicarbonate of soda, spices and salt.
  2. In a large bowl, beat the butter and sugar together until light and fluffy.
  3. Add the egg and the treacle and mix until thoroughly combined.
  4. Add the lemon extract and mix in. 
  5. Gradually add the flour a bit at a time, mixing until fully incorporated before adding more.  You may need to use your hands for the last of it as you end up with quite a thick dough.
  6. Split the dough in two, shape into balls and wrap each ball in clingfilm.  Put in the fridge to rest for about 3 hours.
  7. Preheat the oven to 180°C/350°F/Gas Mark 4 and line 2-3 baking trays with greaseproof paper.
  8. Remove the dough from the fridge and let it sit for about 5 minutes.  Meanwhile lightly flour your work surface and rolling pin.
  9. Roll the dough out to be about 5mm/0.25inches thick and then cut out gravestone shapes with a knife.  Transfer each shape to a tray, spacing the biscuits about 1 inch apart.  You need 12 gravestones but it's worth making a couple of spares in case any break.  Remember not to make them too big or they won't fit in the cakes.
  10. Bake for about 10 minutes before removing from the oven and leaving to cool on a wire rack. 

Cakes:
  • 60g/2oz butter
  • 140g/5oz caster sugar
  • 1 large egg
  • 1/2 tsp vanilla extract
  • 115g/4oz plain flour
  • 30g/1oz cocoa powder
  • 1/4 tsp bicarbonate of soda
  • 1/4 tsp salt
  • 80ml/2.8fl.oz sour cream (or sour cream substitute)
  1. Preheat the oven to 180°C/350°F/Gas Mark 4 and line a 12 hole muffin tin with cases, preferably black or dark brown.
  2. Cream the butter and sugar together until very pale and fluffy.
  3. Add the egg and vanilla and beat until well incorporated.
  4. In a separate bowl, combine the flour, spices, bicarbonate of soda and salt by sifting them together.
  5. Add 1/3 of the dry ingredients to the cake batter and mix in thoroughly.
  6. Add half the sour cream and mix.
  7. Now add half of what is left of the dry ingredients and mix.
  8. Add the rest of the cream and mix.
  9. Add the last of the dry ingredients and blend together well.
  10. Spoon equal amounts of batter into the cases and then bake in the oven for 15-20 minutes, until a skewer inserted into the middle comes out clean.
  11. Cool on a wire rack before decorating.

Buttercream:
  • 60g/2oz unsalted butter
  • 30g/1oz cocoa powder
  • 1/3 tsp salt
  • 1/2 tsp vanilla extract
  • 250g/8.8oz icing sugar
  • 2 tbsp milk
  • 2 tbsp double cream
  1. Beat together the butter and cocoa powder until smooth and creamy.
  2. Add the salt, vanilla extract, icing sugar and milk and beat until well incorporated.
  3. Add the cream and mix in until smooth.
 Assembly:
  • A small amount of white ready to roll fondant / 12 ready-made fondant flowers
  • White writing icing/chocolate
  • 2 tbsp cocoa powder
  1. Spread about 2 heaped teaspoons of buttercream onto each cooled cupcake and smooth to the edges with a spoon.
  2. Set the cakes on a sheet of baking parchment and use a sieve to dust with icing sugar.  Try to cover all the buttercream.
  3. Use the writing icing to decorate the gingerbread gravestones and then push one into the middle of each of the cakes.  They should stand on their own.
  4. If using ready to roll fondant, use a small flower cutter to make little fondant flowers.  
  5. Place the flowers on top of the cocoa covered buttercream.