Showing posts with label marshmallow fluff. Show all posts

Thursday, 21 July 2016

Chocolate Brownie and Meringue Cake


May and June were BUSY this year.  I took on a lot of extra days of work so it was almost like working full time again.  Good thing really since, come August, that is exactly what I am doing!  That job interview I mentioned way back in March/April? The one I thought I did terrible on and came out of crying?  Turns out I actually did great and am now a permanently contracted, full time teacher with Fife Council.  Once again, there were issues with paperwork and references and the like but everything should be sorted now and I will have a class again.  I am so excited!  Planning has therefore been taking up a lot of my free time.  I am making up a whole bunch of maths resources for myself at the moment.  Hence a lack of blog activity. 

There hasn't been a lack of baking mind you.  I have baked quite a few things in the last couple of months but have generally not been 100% happy with them.  So obviously they weren't going up on here.  The people I made them for loved them.  They always do.  But I am a perfectionist.  There's one cake I was very proud of that you guys never got to see because I hate the photos I took.  They were just awful.

But now it's the holidays and I have a lot of free time on my hands, I can get back to some regular baking for a bit.  


My main audience still remains the Hubby's RPG group in Dundee.  They are supposed to be giving me requests or ideas but they're not that great at it.  I get a lot of the same, safe things suggested and that's no fun.  Chocolate is a popular one so I keep looking for ways to make chocolate cake a bit different.  This time around I decided to include meringue.  I liked the recipe I found that cooked it as part of the layers.  It looked very effective.  I did change out the filling though.  One of the party doesn't like cream or fruit and the original had raspberries and cream in it.  I asked the Hubby if he would prefer chocolate buttercream or marshmallow fluff.  He went with the latter.

It was a good call.  I've never made chocolate marshmallow fluff before so just had a bit of a guess and added cocoa powder at the stage I would usually include vanilla extract.  It worked REALLY well.  I am not a big fan of adding cocoa powder to things.  I find it too bitter.  Marshmallow fluff is so sweet though that it balances it out beautifully.  It was so yummy I was licking the remains out the bowl.

It ended up being a very pretty cake so I was happy about that.  I was worried the brownie would be dry but it wasn't.  The meringue was perfect and didn't taste of eggs like the last time I made it.  And, as I said, the marshmallow fluff was fantastic!  Very much enjoyed by all.


Recipe - adapted from Miranda Gore Brown via BBC Food
Makes 1 x 9inch cake

Brownie:
  • 200g/7oz dark chocolate
  • 200g/7oz butter
  • 250g/8.75oz icing sugar
  • 3 eggs
  • 115g/4oz plain flour 
Meringue:
  • 4 egg whites
  • 200g/7oz caster sugar
  • 1/2 tsp cream of tartar  
Marshmallow Filling - adapted from Bake Me I'm Yours... Sweet Bitesize Bakes
  • 1 large egg white
  • 125g/4.5oz caster sugar
  • 25g/0.75oz golden syrup
  • pinch of salt
  • 1/4 tsp cream of tartar
  • 1 tbsp water
  • 2 tsp cocoa powder
  • 100g/3.5oz dark chocolate
  1. Preheat the oven to 190C/375F/Gask Mark 5 and grease and line two 23cm/9inch round cake pans.
  2. Start with the brownie base.  Melt 180g/6.25oz of the chocolate in a heatproof bowl placed over a pan of gently simmering water.  Chop up the remaining 20g/0.75oz and set aside.
  3. Beat the butter and icing sugar together in a large bowl until pale and creamy.
  4. Whisk in the eggs one at a time until well combined.
  5. Add the flour a little at a time and beat in until the mixture is smooth.
  6. Fold the melted chocolate into the mixture until it is evenly combined and then fold in the chopped chocolate.
  7. Split the mixture between the prepared cake tins and bake for 10-12 minutes.  The top of the brownie will have just started to solidify.  Set tins aside and allow to cool slightly.  Reduce the oven temperature to 170C/325F/Gas Mark 3.
  8. Make the meringue by whisking the cream of tartar together with the egg whites until soft peaks form.
  9. Slowly whisk in the sugar until the meringue is smooth and glossy.
  10. Divide the meringue in half and spoon it over the brownie bases.
  11. Bake for a further 30 minutes, or until the meringue is just starting to turn golden brown.
  12. Set aside to cool completely in the tins.
  13. To make the filling, put a heatproof bowl over a saucepan of simmering water.
  14. Place everything except the cocoa powder in the bowl.
  15. Whilst it is heating, stir with an electric whisk for several minutes (about 10) until you get shiny soft peaks.
  16. Remove from the heat and whisk for another two minutes to thicken it up.  
  17. Sift in the cocoa powder and whisk in too.
  18. Allow to cool.
  19. Chop 50g/1.5oz of the dark chocolate into small pieces and fold into the cooled marshmallow fluff.
  20. Carefully remove one of the cake layers from its tin and place it meringue-side-down on a plate.
  21. Cover with the marshmallow filling, leaving a slight gap around the edge.
  22. Remove the other layer and place it meringue-side-up on top of the filling.
  23. Melt the remaining dark chocolate and drizzle over the top of the cake.  Allow to set.    

Monday, 20 May 2013

Strawberry and Cream Fudge


Pinterest is a site I like to go to when I'm feeling stressed or irritated with the world or having a sad day, and probably my favourite section to browse is food.  Just trawling through pages and pages of pins can be quite soothing.  I have found some new dinners to add to my repertoire (oh three cheese, spinach lasana and chicken parmesan, how I love you!), which is great since I need more variety.  The well-eat plate we have at school has been making me feel bad (stupid vegetables).  I have also stumbled across many a recipe I want to try out for the blog.  Whether this was one of them or not I'm not one hundred percent sure, since out of some weird pride thing I don't pin recipes for the blog: I bookmark them.  Of course, I also bookmark things from all over the net so...yeah.  I think I found this through Pinterest though.  I don't remember googling fudge recipes.

It was the picture that initially attracted me to this recipe.  Seriously, this woman's photos are beautiful!  And her fudge looks amazing.  I wish mine had come out looking that smooth.  I probably used too small a knife.  I also wish it was as beautifully bright in colour but white chocolate over here always gives things an off-white-ish yellow colour and my pink always seems to be slightly dull.  Anyway, once I read the ingredient list I knew I definitely wanted to make it because it was all things I liked and seemed pretty easy to put together.  No temperature monitoring is always a plus!  Flavouring with jelly powder is such a clever idea.  I used Hartley's strawberry flavour, since I had that in my cupboard.  Makes me wonder if I can use other flavours to make other fudge.  I bet I could make three layered citrus fudge if I used orange, lemon and lime jelly powder!  Guess I know what the next fudge recipe I try will be! 

I made a point to read all the comments left by people on the original blog too.  You can find out all about various problems and solutions doing that.  The main one seemed to be that you had to make sure you boiled it for the full amount of time, or the white layer won't firm up properly.  Also that you should definitely use chocolate chips (or morsels in the original), not chopped chocolate since the chips have something in them that helps them hold their shape.

I was rather pleased to discover that the recipe I use to make marshmallow fluff does in fact produce exactly 200g/7oz of the stuff.  I really wasn't sure if I would need a double batch or not so I made one and then weighed it.  Absolutely perfect!  Hurrah!  I did also discover that you can buy the stuff over here in the UK.  Sainsbury's apparently sell it (at least it's listed on their search results for online groceries).  So I could have bought it but the fiancĂ© said it probably wouldn't taste as good as homemade, what with preservatives and all.  I agree.  Plus, it takes barely any time to make and is pretty easy.

Sadly, my white layer did not come out quite as firm as I think it is meant to.  Perhaps it wasn't quite five minutes when I took it off the heat?  It could also be because I didn't put cream of tartar in my marshmallow fluff.  Oops.  Or even because I used homemade fluff?  Maybe I should try it with the jarred brand.  The pink layer is firmer thanks to the gelatin in the jelly mix.  However, this doesn't bother me at all.  Whilst it does make the fudge a little sticky it doesn't stop it from tasting WONDERFUL.  It is seriously delicious.  So creamy and the strawberry is just perfect.  Incredibly more-ish indeed.  I really have to stop myself going into the fridge or I'll be eating far too much and my teeth will suffer for it!  I suppose the well-eat plate isn't getting to me as much as I thought it was.


Recipe - adapted from Shugary Sweets
Makes about 90 bite size pieces
  • 500g/17.5oz granulated sugar
  • 185ml/6.5fl.oz double cream
  • 170g/6oz unsalted butter
  • Pinch of salt
  • 300g/10.5oz white chocolate chips
  • 200g/7oz marshmallow fluff (see below to make your own)
  • 1 tbsp strawberry gelatin powder
  1. Prepare a 33x23cm / 13x9inch tray by greasing it and covering in greaseproof paper.  It is also recommended to have the chocolate chips, marshmallow fluff and gelatin powder all measured out and to hand so you can add it to your mixture quickly.
  2. Melt the butter, sugar, cream and salt in a large pan placed over a gentle heat.
  3. Once melted, increase to a medium-high heat and bring to a boil.
  4. Boil for 5 minutes, stirring constantly as you do.  Make sure to do the full five minutes otherwise it will affect the texture.
  5. Once 5 minutes is up, remove from the heat and whisk in the chocolate chips and marshmallow fluff until it is smooth and thick.
  6. Pour half the mixture into the prepared tray and tip about to spread it over the whole thing.
  7. Add the gelatin powder to the remaining mixture and beat until colour is evenly distributed and it is smooth.
  8. Pour on top of the mixture in the tray, aiming to cover all of it.  Use a knife to smooth it out and then a fork to swirl it with the white layer.
  9. Chill in the fridge for at least four hours (though overnight is better).
  10. Once firm, remove from fridge and cut into pieces with a knife  (I made an 15x6 grid to get 90 pieces).  Store in an airtight container in the fridge.
Marshmallow Fluff - adapted from Bake me I'm yours...Sweet Bitesize Bakes
  • 1 large egg white
  • 125g/4.5oz caster sugar
  • 25g/0.75oz golden syrup
  • pinch of salt
  • 1/4 tsp cream of tartar
  • 1 tbsp water
  • 1 tsp vanilla extract
  1. Put a heatproof bowl over a saucepan of simmering water.
  2. Place everything except the vanilla extract in the bowl.
  3. Whilst it is heating, stir with an electric whisk for several minutes (about 10) until you get shiny peaks.
  4. Remove from the heat and whisk for another two minutes to thicken it up.  
  5. Add the vanilla and whisk in too.
  6. Allow to cool.
 

Tuesday, 12 March 2013

Chocolate and Rose Cupcakes


So Sunday rolled around again and I realised I hadn't decided on what type of cakes I wanted to make for Tuesday.  I wasn't doing a big shop this week so I had to make sure I picked something that didn't require anything special in it.  It had to be in my cupboard or be something I could get from the local shop (which ended up being cocoa powder because I had run out).

I actually got the idea from my biscuit book, which has a recipe for Turkish Delight biscuits.  It made use of marshmallow and rose sugar and so I thought maybe I could make a cake based on Turkish Delight.  I did have rose extract in the cupboard after all.  But what flavour of cake to do?  I was going to use the rose in the topping, and possibly for a filling, but what to accompany it with?  Then I came to the logical conclusion of chocolate cake!  You get a sweet called Fry's Turkish Delight, which is rose Turkish Delight surrounded by chocolate.  So chocolate must be a good accompaniment.  I decided to check by seeing if there were recipes that used rose and chocolate together and turns out there's lots.  I ended up using one for the chocolate cake part of these cupcakes, though theirs had rose in the cake too.  I chose to leave it for just the decorative part.  I also liked the recipe for being egg free, though my choice of filling means the whole thing is not completely egg free any more.  Oh well.  I can save it to use again.


So I had the cake recipe and I knew rose would flavour whatever I topped it with.  Now, the biscuit recipe used marshmallow.  Therefore I thought I would use marshmallow fluff, and just swap out the vanilla in the recipe I use for rose.  But then I decided I want to fill the cakes, so as to be more reminiscent of the sweet.  So rose marshmallow fluff would fill it.  Should I also top it with it?  There was a fair bit of uhmming and ahhing before I decided that, no, I would make a rose buttercream to top instead.  And since I got a large, closed star nozzle at Christmas, I would pipe roses on top!  Add pink cases and voilĂ !  It was a very pretty result indeed.

It tasted good as well.  I will admit, when I first tried the rose buttercream it was a bit odd.  My brain couldn't comprehend that it tasted like the smell of roses.  Strange I know but the same thing happened to the fiancĂ©.  But the more of it I tried, the more I liked it.  So apparently it's one of those flavours that grows on you.  Grows quickly though.  It also went well with the chocolate.  I'm not a fan of chocolate cake, but even I thought it was lovely accompanied by the rose.


Recipe - makes 12

Cakes - adapted from the Food Network
  • 175ml/6oz skimmed milk
  • 3/4 tsp apple cider vinegar
  • 140g/5oz self-raising flour
  • 20g/0.7oz cocoa powder
  • 1/4 tsp baking powder
  • 1/2 tsp bicarbonate of soda
  • 1/4 tsp salt
  • 3/4 tsp cornflour
  • 35ml/1.25fl.oz sunflower oil
  • 1/2 tbsp double cream
  • 120g/4oz sugar
Rose Marshmallow Fluff - adapted from Bake me I'm yours...Sweet Bitesize Bakes
  • 1 large egg white
  • 125g/4.5oz caster sugar
  • 25g/1oz golden syrup
  • Pinch of salt
  • 1/4 tsp cream of tartar
  • 1 tbsp water
  • Rose extract
  • Pink food colouring   
Rose Buttercream:
  • 115g/4oz butter 
  • 225g/8oz icing sugar, plus extra for dusting
  • Rose extract
  • Pink food colouring
  • 1/2 tbsp water
  1. Preheat the oven to 180°C/350°F/Gas Mark 4 and line a 12 hole muffin tin with cupcake cases (smaller than muffin cases).
  2. Put the milk and apple cider vinegar in a jug, mix and let sit for about 15 minutes until it starts to curdle.
  3. Sift the flour, cocoa powder, baking powder, bicarbonate of soda, salt and cornflour together into a bowl and set aside.
  4. Whisk the vinegar milk into the oil and cream in a large bowl for about 5 minutes.
  5. Add the dry ingredients to the wet in three stages, mixing them in gently and only until they're just incorporated with no large lumps.
  6. Divide the mixture amongst the cases, filling them about halfway.
  7. Bake for 20-25 minutes until risen and springy, and a skewer inserted into the centre comes out clean.
  8. Leave on a wire rack to cool.
  9. Make the marshmallow fluff by putting a heatproof bowl over a saucepan of simmering water.
  10. Place everything for the marshmallow fluff except the rose extract and food colouring in the bowl.
  11. Whilst it is heating, stir with an electric whisk for several minutes (about 10) until you get shiny peaks.
  12. Remove from the heat and whisk for another two minutes to thicken it up.  
  13. Add the food colouring and whisk in too.
  14. Mix in a few of drops of rose extract at a time until you get the intensity of flavour you want.
  15. Allow to cool.
  16. Make the buttercream by blending all the ingredients except the extract together until smooth.
  17. As with the marshmallow fluff, add a few drops of rose extract at a time until you get a flavour you are happy with.
   
Assembly:
  1. Put the marshmallow fluff into a piping bag fitted with a large, round nozzle.  Put the buttercream in one fitted with a large, closed star nozzle.
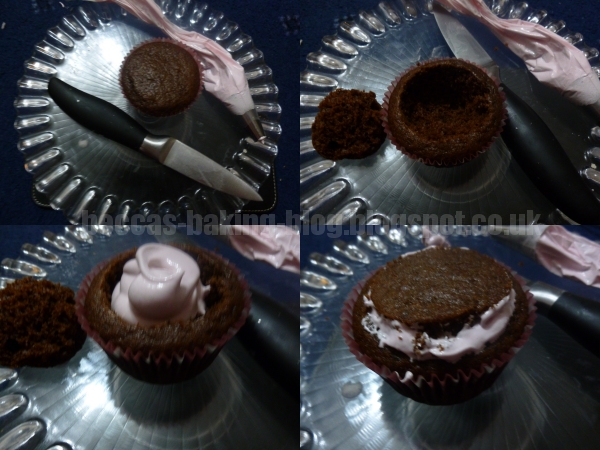
  2. Use a knife to cut a large core out of the centre of the cake.  Do not throw away.
  3. Fill the hole with marshmallow fluff then push the core back into place.  It doesn't matter if it spills over or looks messy, you're going to hide it with the buttercream.
  4. Position the nozzle of the buttercream bag perpendicular to the cake, starting in the centre.  Slowly pipe a swirl that moves outwards from the centre, tilting the nozzle so it faces the starting point, and slightly increasing the pressure as you get further out to make bigger 'petals'.  You should get a rose.
  5. Dust with icing sugar.

Wednesday, 27 February 2013

S'mores Cupcakes


I have been in a marshmallowy mood this week.  It did start with the desire to make marshmallow and chocolate stuffed chocolate chip cookies, but they didn't quite work out due to the cookie dough being too...spreadable and everything falling apart in the oven.  Very disappointing, but I'll go into that properly when I remake them successfully and do a write up.

Anyway!  S'mores cupcakes was what I decided I wanted to make for the fiancĂ© to take on his weekly trip to Dundee.  So I found a recipe by browsing around the internet for which I had all the ingredients and that looked good.  I did have to make one change though, which was that I used McVities Digestives in place of Graham crackers.  We don't have those here in the UK and on the rare occasions I've made s'mores (mainly back when I was a Brownie), we used Digestives or Rich Teas for the base.  Yum yum!  Besides, the fiancĂ© really likes Digestives and I happened to have a packet sitting in the cupboard.  I reduced the cocoa slightly, but only because I didn't have quite enough.  Didn't seem to make much of a difference.   I also ended up putting a little too much bicarbonate of soda in.  I picked up the wrong spoon!  I added less baking powder to compensate and again, nothing seemed amiss with the final result.


So the final product has a Digestive crumb base, topped with a little chocolate, then chocolate cake sprinkled with more biscuit and chocolate, and finished off with a swirl of toasted marshmallow fluff.  As usual, my marshmallow fluff is homemade rather than store bought.  I don't think you can get that over here either?  I've not seen it anyway.  I had to toast mine under the grill, since I don't own a blowtorch.  I had to watch them diligently and rotate them about to get an even toasting, since the flame for my grill runs down the centre of my oven.  The result was good though.  A slightly firm exterior with a squishy, soft interior.  The fiancĂ© said it was perfect, having expected it to be a bit rubbery.

What can I say?  They were very well received.  The biscuit base proved to be popular with everyone, as was the marshmallow.  Again, it was a really moist cake due to it being a very wet batter.  And it's definitely reminiscent of s'mores.  Quite a nice alternative indeed!


Recipe - adapted from The Martha Stewart Show and Bake me I'm yours...Sweet Bitesize Bakes
Makes about 12


Cake:
  • 200g/7oz caster sugar
  • 140g/5oz plain flour
  • 40g/1.5oz cocoa powder
  • 1 tsp bicarbonate of soda
  • 1/2 tsp baking powder
  • 1/2 tsp salt
  • 1 large egg
  • 125ml/4.5fl.oz milk
  • 60ml/2fl.oz sunflower oil (or any other flavourless oil)
  • 1 tsp vanilla extract
  • 125ml/4.5fl.oz boiling water
Digestive Base:
  • 40g/1.5oz caster sugar
  • 90g/3oz McVities Digestive biscuits - about 6 or 7 biscuits worth 
  • 40g/1.5oz butter
  • 125g/4.5oz milk chocolate
Marshmallow Fluff Topping
  • 1 large egg white
  • 125g/4.5oz caster sugar
  • 25g/1oz golden syrup
  • Pinch of salt
  • 1/4 tsp cream of tartar
  • 1 tbsp water
  • 1 tsp vanilla extract
  1. Preheat the oven to 180°C/350°F/Gas Mark 4 and line a 12 hole muffin tin with muffin cases.
  2. Sift the sugar, flour, cocoa powder, baking powder, bicarbonate of soda and salt together into a large bowl.  Mix together with a spoon.
  3. In a separate bowl, mix the eggs, milk, oil and vanilla extract until combined.
  4. Add the wet ingredients to the dry and stir in to combine.
  5. Add the boiling water and stir until smooth, with the batter being even in colour and consistency.  Put to one side.
  6. Melt the butter and in the meantime, crush the biscuits in a bowl until you get small crumbs.
  7. Add the melted butter and sugar to the biscuit crumbs and mix together.
  8. Chop up the chocolate into small pieces.
  9. Put 1 tablespoon of biscuit crumb mix in the base of each muffin case and press down with the end of a rolling pin.
  10. Sprinkle 2 teaspoons of chopped chocolate on top of each base.
  11. Put them in the oven for about 5 minutes.
  12. Remove and fill each case three quarters full with the cake batter.
  13. Sprinkle the remaining biscuit mix and chocolate on top then put back in the oven and bake for 20-30 minutes until the cakes are springy and a skewer inserted into the centre comes out clean.
  14. Allow to cool in the tin for 10 minutes before transferring to a wire rack.
  15. Whilst the cakes cool, put a heatproof bowl over a saucepan of simmering water.
  16. Place everything for the marshmallow fluff except the vanilla extract in the bowl.
  17. Whilst it is heating, stir with an electric whisk for several minutes (about 10) until you get shiny peaks.
  18. Remove from the heat and whisk for another two minutes to thicken it up.  
  19. Add the vanilla and whisk in too.
  20. Allow to cool.
  21. Switch on the grill and spoon into a piping bag fitted with a large round nozzle and pipe swirls on top of each cake.
  22. Place four cupcakes at a time on a tray and place under the grill.  Remove every 30 seconds to check how they are doing and rotate if necessary.  You want only a light brown toasting.

Tuesday, 9 October 2012

Carrot Cake Whoopie Pies with Cinnamon Filling


So last week the game my fiancĂ© was for going to see his friends was cancelled.  This meant he didn't take the cakes I made to Dundee.  He was not too upset by that part, because it meant he got to eat two thirds of them (I took some into work with me).  But I felt a bit bad about them missing out on cakes and because I wouldn't usually make them this week due to working Monday.  So I caved to my own feelings and whipped up something for him to take this week.  I'm a big softie apparently.

Last week I also acquired some new books for my cookbook collection.  The shop I work in sells books (among other things) and we have loads of good deals on.  We're also getting a small period of extra staff discount so I was taking advantage of it.  One of the books I snapped up was The Hummingbird Bakery: Cake Days.  It is quite a nice book and it's where today's recipe comes from.  I found it whilst flicking through and thought my fiancĂ© would enjoy them (I always base what I make for him and his friends primarily on what he likes).  They were based on carrot cake, which he likes, and has a cinnamon filling.  It was also for something I had never made before: whoopie pies.  It was certainly interesting.  And really I should read recipes all the way through because otherwise I start mixing up timings.  I was finishing off the filling at midnight last night and really I needed to let it set for 30 minutes before using it but I wanted to go to bed.  So I just put it in as it was and then put the whole cakes into the fridge.  Next time I'll do it the right way around.  

As for the final result, I have no idea what a whoopie pie should feel like so I don't know if I was successful...I admit I was expecting something more biscuit like but the book said cake so I think I am at least on the right lines.  Taste wise they were apparently very yummy and well received and all gone by the end of the night.


Recipe - adapted from The Hummingbird Bakery: Cake Days
Makes 8-10 

Sponge:
  • 1 large egg
  • 150g/5.5oz caster sugar
  • 125g/4.5oz plain yoghurt
  • 25ml/1fl.oz milk
  • 2 tsp vanilla extract
  • 75g/2.5oz unsalted butter
  • 275g/10oz plain flour
  • 1/2 tsp ground cinnamon
  • 1/2 tsp ground ginger
  • 1/4 tsp ground nutmeg
  • 1/4 tsp baking powder
  • 3/4 tsp bicarbonate of soda
  • 1/4 tsp fine sea salt
  • 100g/3.5oz carrot
Filling:
  • 170g/6oz unsalted butter
  • 1/2 tsp ground cinnamon
  • 280g/10oz icing sugar
  • 175g/6oz vanilla marshmallow fluff (I made it from the recipe I used here)
  1. Melt the butter in a small saucepan and then set aside.
  2. Whisk the egg and the sugar together in a large bowl until pale and fluffy.
  3. In a jug, mix together the yoghurt, milk and vanilla.
  4. Pour into the whisked eggs, followed by the melted butter and mix to combine.
  5. In a separate bowl, sift together the flour, ground spices, baking powder, bicarbonate of soda and sea salt.
  6. Add half to the egg and yoghurt mixture and beat in until just incorporated.  Repeat with the second half.
  7. Peel and grate the carrot. 
  8. Put into a sieve and press down to drain out any liquid.
  9. Add the carrot to the batter and stir in (if using an electric whisk or mixer up until this point, do this by hand) until it is spread evenly throughout the mixture.
  10. Put the batter in the fridge to cool and set for 30-40 minutes.
  11. Meanwhile, preheat the oven to 170°C/325°/Gas Mark 3 and line 2-3 baking trays with greaseproof paper.
  12. Once the batter is cool, spoon small mounds of butter onto the trays.  Make sure you have even numbers of mounds since each pair makes a pie.  The mounds should be about 3-5cm/1.25-2inches in diameter and spaced well apart (at least 2.5cm/1inch) because they will spread out when cooking.
  13. Bake for 10-15 minutes.  They should be lightly golden all over and will spring back when you touch them.
  14. Remove and transfer to a wire rack to cool. 
  15. Whilst the cakes cool, make the marshmallow fluff (if not already done so) and then make the filling.
  16. Mix together the butter, icing sugar and ground cinnamon until the butter and sugar combine together.  
  17. Add the marshmallow fluff and mix until mixture is light and fluffy.
  18. Put the filling in the fridge for half and hour.
  19. When sponges are cold, it is time to fill them.  Spread 1.5 tablespoons of filling mixture on the flat side of one of the cakes then place a second one on top, with the flat side touching the filling, to make a sandwich.  Press together gently.
  20. Repeat until all pies are sandwiches together.

Wednesday, 11 July 2012

Chocolate and Marshmallow Cupcakes


And I'm back.  Lack of updates was due to being on holiday in Italy.  I have to admit, halfway through the week I was going a bit mad and wanting to bake.  And I did bake pretty much as soon as I got home, but I made Florentines again for a present and since I've already posted about them I didn't see the point in posting again.

Anyway, my boyfriend asked me if I would make cakes for him weekly visit to see his friends.  I gladly agreed because I love any excuse to bake.  This was something I thought up whilst I was away and then researched the best way to do things when I returned.  Having a reason to make them was great.  So these are chocolate cupcakes, with a marshmallow centre and topped with marshmallow fluff and drizzled chocolate.  

According to my boyfriend they are really yummy.  Apparently the marshmallow compliments the chocolate well and balances everything out.  So yay!  A success!

I ended up using a couple of different recipes for this, one for the chocolate cakes and one for the marshmallow fluff on top.  Reading around made me decide to add the marshmallow centres after cooking rather than putting a marshmallow in when it was baking.  I admit, the method was tricky because the marshmallow is so sticky but I got there in the end.


Chocolate Cupcakes (with added marshmallow filling) Recipe: - adapted from Cupcakes and Muffins
Makes 12/13
  • 200g/7oz butter
  • 140g/5oz caster sugar
  • 1 tsp vanilla extract
  • 3 eggs
  • 150g/5.5oz self-raising flower
  • 55g/2oz cocoa powder
  • 120-150 mini marshmallows 
  • Small knob of butter
  1. Preheat the oven to 180C/350F/Gas Mark 4.
  2. Put large-ish cupcake cases in a cupcake tray.
  3. Cream together the butter and sugar until it is light and fluffy.
  4. Add the vanilla and beat.
  5. Lightly beat the eggs in a separate bowl and then gradually add to the sugar/butter mix, stirring in after each addition.
  6. Sift together the flour and cocoa powder and fold into the rest of the mixture.
  7. Spoon the mixture into the cases and then bake in the oven for 20-25 minutes.
  8. Allow to cool on a cooling rack.
  9. Put the marshmallows in a glass bowl over a saucepan of simmering water along with the knob of butter.
  10. Once they start melting, stir until smooth.  Leave over the water.
  11. Use a knife to carve a hole out of each cake.  Place the cake from the hole to one side because you're going to put it back on top.
  12. Spoon the melted marshmallow into the holes.  You may need to reheat the marshmallow as you do this because it gets stickier as it cools and is difficult to get off the spoon.
  13. Put the cake 'stopper' back into the cake on top of the marshmallow.
  14. Leave to cool while you make the topping (see below).
Marshmallow Fluff Topping (with drizzled chocolate) - adapted from Bake me I'm yours...Sweet Bitesize Bakes
 
  • 1 large egg white
  • 125g/4.5oz caster sugar
  • 25g/0.75oz golden syrup
  • pinch of salt
  • 1/4 tsp cream of tartar
  • 1 tbsp water
  • 1 tsp vanilla extract
  • About 40g milk chocolate
  1. Put a heatproof bowl over a saucepan of simmering water.
  2. Place everything except the vanilla extract in the bowl.
  3. Whilst it is heating, stir with an electric whisk for several minutes (about 10) until you get shiny peaks.
  4. Remove from the heat and whisk for another two minutes to thicken it up.  
  5. Add the vanilla and whisk in too.
  6. Allow to cool.
  7. Spoon into a piping bag fitted with a large star nozzle and pipe large swirls on top of each cake.
  8. Melt the chocolate in a glass bowl over a pan of simmering water.
  9. Spoon the chocolate into a piping bag fitted with a small, round nozzle.  Pipe spirals on top of the marshmallow fluff.