Showing posts with label ginger. Show all posts

Sunday, 15 November 2015

Toffee Apple and Pumpkin Gingerbread Cake


We had quite a lovely autumn this year.  The colours of all the trees around here were just stunning!  I really wish I had thought to get a picture of the view coming into the village before the truly horrible weather set in.  It was seriously pretty with the trees and the church and the local restaurant lit up with its fairy lights.  Especially when the sun is giving off that nice warm glow you only get when it's low in the sky.  Ah well.  It didn't occur to me until too late and now everywhere is wet and grey and most of the leaves have been blown off the trees.

Anyway, since it's autumn I felt like baking with some autumn flavours.  I was determined to include pumpkin, as I have several tins of it in my cupboard from bulk buying it last year.  However, I then started going a bit mad with wanting to add all sorts of flavours so I also ended up using apples, toffee and ginger.  I used a combination of two recipes for my autumnal experiment.  Well, actually, I used three as originally I was going to include cinder toffee too.  I scrapped that, though not until after I made it.  The cinder toffee turned out well but tasted ever so slightly burnt so it left a bitter after taste.  I didn't think that was right so I figure I'll try that again another day.  The cake was fine without it anyway. 


I made this cake twice as the first one did not turn out the way I wanted.  It was far too dense in the middle.  It still tasted good but it annoyed me because I knew it should have been more cake-y.  Turns out I over mixed it.  I got too carried away with my lovely mixer.  Oops.  So the second time around I made sure to do the barest minimum of mixing for each stage and folded in the flour.  The result was much better so I was happy.

It's not the most attractive looking cake.  But I think that seems to be common with fruit baked on the top.  I never think upside-down cakes look particularly appealing unless you've used pineapple.  Cooked toffee and fruit and dark cake can look overdone, even though it isn't.  It probably would look a bit better if my apples were a bit more evenly cut.  Ah well.

This cake was scrummy.  Nice and moist with a distinctly apple taste and a ginger note at the end.  Drizzled with leftover toffee sauce is a necessity and this would go well with warm cream. 


Recipe - inspired by Sophie Thompson (via A Mummy Too) and Very Best Baking by Nestle

Toffee Sauce:
  • 100g/3.5oz butter
  • 100g/3.5oz muscovado sugar
  • 150ml/5fl.oz double cream
Cake:
  • 245g/8.5oz plain flour
  • 1/2 tsp baking powder
  • 1/4 tsp bicarbonate of soda
  • 1.25 tsp ginger
  • 1/2 tsp pumpkin pie spice (see here to make your own)
  • 1/4 tsp salt
  • 115g/4oz butter
  • 115g/4oz granulated sugar
  • 45g/1.5oz brown sugar
  • 2 large eggs
  • 1/2 a tin of canned pumpkin (about 215g/7.5oz)
  •  3-4 large green eating apples (like Granny Smith)
  • 60ml/2fl.oz treacle 
  1. Start by making the toffee sauce.  Put the butter, sugar and cream in a saucepan together and set over a low heat.
  2. Stir the mixture until it is bubbling and golden.  Remove from heat and set aside to cool.
  3. Line a 23cm/9inch round, spring-form or loose bottomed cake tin with greaseproof paper and preheat the oven to 180°C/350°F/Gas Mark 4.
  4. In a large bowl mix together the flour, baking powder, bicarbonate of soda, ginger, pumpkin pie spice and salt.
  5. Cream the butter and the sugars together in a separate bowl until fluffy.
  6. Add the eggs one at a time and beat in after each addition until just incorporated.
  7. Peel and grate half an apple and add it, the pumpkin and treacle to the mix.  Beat in.
  8. Gradually fold in the dry ingredients.
  9. Spoon half the cake batter into the prepared tin and smooth out.
  10. Peel half of the remaining apples and cut into thin slices.  Arrange the slices in a spiral pattern inside the tin.
  11. Drizzle with about 1/3 of the toffee sauce.
  12. Repeat steps 9-11 with the remaining batter, apples and toffee sauce (you should have some sauce left over for serving).
  13. Bake the cake in the oven for just over an hour (a skewer inserted through the middle of the cake should come out clean).
  14. Allow cake to cool in the tin for at least 45 minutes before unmoulding then finish cooling on a wire rack.
  15. Serve with remaining toffee sauce. 

Tuesday, 21 July 2015

Gingerbread Ice Cream


So despite what the weather says (did you see the photos from the St. Andrews Open?), it is summer here in Scotland.  We have had the odd burst of sunshine here in Fife but we've also had a good share of torrential downpours, as well as an amazing thunderstorm.  However, summer is summer and that means ice cream!  Although I actually made the first batch of this ice cream during the Easter holidays and my goodness is it one of the best things I have ever come up with!

Back story time!  During the Easter break the Hubby and I went on a mini holiday to Glasgow, in part because I needed to get away from everything and have an excuse not to think about work.  The Spring term was also the longest term of the year so I was exhausted by the end of it.  A couple of days away from home was very necessary.  We booked into our favourite hotel and enjoyed a couple of days meeting up with my best friend (and assessing her boyfriend, who we liked very much), lots of shopping and a long walk to and wander around the Kelvingrove museum. It was lovely.  We then usually spent the evenings curled up in our room, reading and watching TV and amongst the things we watched was MasterChef.

This started us on a bit of a binge watch of MasterChef on the iPlayer.  I like watching people make food.  It is fascinating.  Anyway, one thing that quite a few contestants made was ice cream (how they did so in an hour baffled me) and amongst the flavours that got made was ginger.  This got me thinking back to Christmas when I was contemplating the idea of a gingerbread ice cream as a nice holiday themed dessert.  I figured this holiday, even though it was not the Christmas one, was a good time to finally put the idea into practise. 


I decided to use ginger ice cream as a basis for my recipe and luckily my David Lebovitz book provided me with one of those.  However, I knew I would not get the gingerbread taste from just ginger.  So I switched out caster sugar for a mix of muscovado sugar and golden syrup, two of the key ingredients in any good gingerbread recipe.  I also decided to use just cream, rather than a combination of cream and milk.  More fat in ice cream means less ice crystals develop when frozen.  I also think it tastes better.  I had to estimate amounts for the different ingredients but I did a pretty good job since it turned out really well (why yes, I am a bit smug about this one).  For a little bit of extra flare, I baked some tiny gingerbread flowers for the original batch that were mixed in after churning along with some gingerbread crumbs.  For my most recent batch I used store bought gingerbread, which works just as well in my opinion, though the Hubby disagrees.

I was surprised at how much this tastes like gingerbread!  It is almost bizarre, given it's cold ice cream but has that delicious sweet heat that comes with good gingerbread.  The biscuit crumbs throughout add a nice bit of crunch too.  This stuff is so scrummy!  I like it, the Hubby likes it and so do his parents.  The Hubby's dad is not a big ice cream person but he loved this and went back for more so if that isn't a good enough endorsement, I don't know what else to tell you.


Recipe - inspired by Fresh Ginger Ice Cream from The Perfect Scoop
Makes about 1 litre

  • 85g/3oz fresh ginger root
  • 750ml/26fl.oz double cream
  • 6 tbsp golden syrup
  • 80g/3oz muscovado sugar
  • Pinch of salt
  • 5 egg yolks 
  • Gingerbread biscuits (amount is up to you)
  1. Slice up the ginger root into thin slices and place in a saucepan.
  2. Cover with 2cm of water, bring to the boil and then let it boil for 2 minutes.
  3. Remove from the heat and drain the water.
  4. Add the sugar, salt, golden syrup and 500ml of the cream to the saucepan.
  5. Stir over a medium heat until the sugar has melted and the mixture is warm and a nice golden brown colour.
  6. Remove from the heat, cover and allow to steep for an hour.
  7. Put the remaining cream in a large bowl and set a sieve over the top.
  8. In a medium bowl, whisk the egg yolks.
  9. Use a slotted spoon to remove the pieces of ginger root from the cream mixture and discard.
  10. Warm the mixture through.
  11. Add the warmed cream mixture to the egg yolks, whisking them the entire time, and then add everything back into the saucepan.
  12. Cook the mixture over a low to medium heat, stirring with a spatula the whole time.  Make sure the spatula scrapes the bottom of the pan and that you do not allow the mixture to boil.  Keep cooking until the custard thickens and coats the spatula.
  13. Pour the custard through the sieve into the cream.
  14. Place the bowl of custard into an ice bath and stir continuously until the mixture has cooled.
  15. Chill thoroughly in the fridge before transferring to your ice cream maker and continue according to manufacturer's instructions.
  16. Once the ice cream has churned and thickened, place the gingerbread into a bag and crush with a rolling pin so that you have a mix of larger pieces and crumbs.  Add these to the ice cream and churn for about 2 minutes before transferring to a freezer-proof container.  Freeze for at least an hour before serving.

Monday, 15 December 2014

Cola Gingerbread Men for the Great Food Blogger Cookie Swap


My oh my, baking has been even more lacking.  Work is hard and distressing right now and not looking to get better any time soon, hence the sheer amount of not posting there has been.  Sorry.  But you don't want to hear about that, you're here for cookies!  Specifically, for cookie swap cookies!

The Great Food Blogger Cookie Swap 2014

I stumbled across the Great Food Blogger Cookie Swap last year, after it had closed.  I was really disappointed as it looked like such fun!  So of course I immediately added myself to the mailing list so I would not miss out next time.

It wasn't until mid October that I began to wonder about whether or not the swap had opened up again.  I hadn't received any email saying so.  Some investigation revealed that yes, it had opened up, and that my email had ended up in the Junk folder.  A good thing I checked or I'd be sitting out this year too!  So I got signed up and then began plotting.

The idea for the cookies came from a book I was reading.  In the story one of the characters is a chocolatier but at one point it mentioned cola gingerbread.  Well, I was intrigued.  What an interesting idea and rather ideal for a festive gift.  Gingerbread is very Christmassy, as far as I'm concerned.  The cola is an added bonus as I have always felt that the Coca-Cola advert with the trucks and the song and the lights is the first sign that it is almost Christmas!  I don't care about what's on sale as soon as Hallowe'en finishes, it's not the festive season until Coca-Cola announces that the holidays are coming!


Anyway, I ended up having to experiment with this recipe for a couple of weeks as there was not an existing recipe for cola gingerbread cookies (that I could find).  So I was having to tamper with an existing recipe.  For my initial batches the shape held up but they caught very easily and the cola flavour was rather too subtle.  So I had to increase the amount of syrup to improve the flavour.  Unfortunately that meant the cookies spread.  Not such a big deal really, except that it meant I couldn't do my original idea for the final look.  Based on something I had seen on Pinterest, I wanted to have my gingerbread men hugging their cola bottles.  This was also part of the experimentation.  It worked well in the early batches but wouldn't in the later ones.  Flavour trumps aesthetics though for me so I just went with the spreading batches and used icing to attach the cola bottles to my little men.  Not quite as lovely but still rather cute.  The only other problem this caused was that packaging the little guys was a bit of a curfuffle as some of the bottles would come away from the hands.  I managed it in the end though and it seems they arrived fairly intact at their various destinations! 

And once my own cookies were away, the ones from the lovely bloggers who got me in the swap started arriving!  It was kinda fun to get mystery boxes of cookies.  I didn't eat any until the weekend though since the Hubby and I decided to pack them all up and take them to Glasgow with us as we were away for a shopping weekend.  You can see them in all their delicious glory in the pictures below.  From top to bottom: Cranberry, White Chocolate and Sea Salt cookies from Ellie of RovingLights; Malted Chocolate Chip Cookies from Kirsty of Ever So Sweet; and Oat and Maple Syrup Biscotti from Tina of The Worktop.  Thank you so much, ladies.  These were scrumptious and the Hubby and I thoroughly enjoyed them!


I am hoping my swapees liked their cookies just as much.  I can tell you that we certainly enjoyed eating the spares.  I'm not much of a fan of gingerbread and even I was scoffing them without thinking.  They're a slightly soft cookie which are not too hot.  The ginger and cola mix nicely, especially when you eat the cola bottle with the cookie.  Yum yum!


Recipe - adapted from Home Baking Biscuits and Cookies
Makes 36
  • 350g/12oz plain flour
  • 1 tsp bicarbonate of soda
  • 2 tsp ground ginger
  • 100g/3.5oz butter
  • 175g/6oz light brown sugar
  • 1 egg yolk
  • 4 tbsp cola syrup
  • 2 tbsp golden syrup 
  • Decorative sugar balls
  • 36 cola bottle sweets
  • 2 tbsp icing sugar
  • Cold water
  1. Preheat the oven to 190°C/375°F/Gas Mark 5 and line a few baking trays with greaseproof paper. 
  2. Mix the flour, bicarbonate of soda and ginger together in a bowl.
  3. Add the butter in pieces and then rub into the dry ingredients until the mixture resembles breadcrumbs.
  4. Stir in the sugar and then make a well in the centre.
  5. Add the egg yolk, cola syrup and golden syrup and mix together.
  6. Knead into a smooth dough.
  7. Sprinkle a clean surface with flour and roll out the dough to about 5mm/0.25inches thick.
  8. Cut out gingerbread men with a 10cm/4inch cutter.
  9. Space out well on the tray as these cookies spread.  Create eyes and buttons by pushing the sugar balls into the dough.
  10. Cook for about 10 minutes, until the edges are just starting to brown.
  11. Remove and allow to rest on the tray for a minute before transferring to a wire rack to finish cooling.
  12. Once cool, mix the icing sugar with a little water to get a fairly thick icing.
  13. Place a blob of icing on one of the hands of each of the gingerbread men and stick a cola bottle sweet to the blob.  Leave to set.

Thursday, 14 November 2013

Pear, Raisin and Maple Squares


It's Lady Behind the Curtain Dessert Challenge time again and this month's ingredients were pears and maple.  How exciting, more ingredients I have never used before, let alone in combination!

Now, I am wondering if I am developing a habit when it comes to these challenges.  Just like last time, I ended up making two different things: one that I was not happy with and therefore does not get to grace the blog and then a second which is absolutely adored by everyone who gets to eat it.  It is madness.  Hopefully, this will not become a regular thing.  It can be a bit exhausting, as well as disappointing for a perfectionist like me.

Admittedly, this month's failure was still edible and did taste good according to my guinea pigs.  The problem was the textures didn't gel.  With both recipes, I was substituting a lot of ingredients.  So the original recipe I had found the recipe was for apple cookies.  Now, as you know by now, being British, when I hear the word 'cookie' I think crunchy, not soft.  So I was expecting a crunchy, crumbly biscuit filled with pear and drizzled in a maple syrup glaze.  What I ended up with was soft cakes with chunks of hard pear in and drizzled with the glaze.  It did not work and I was annoyed.  Even though they got eaten and were enjoyed, the texture thing was something everyone agreed on so it was out.  It wasn't getting used and I needed to come up with something else instead.


Now, the magazine I was using for the ghost cookies was still sitting out during this dilemma.  So I decided to flick through it idly and brood.  Along the way I stumbled across a recipe for apple, raisin and honey squares.  It did not look too complicated and there were oats involved so it was more likely to yield the crumbly, crunchy texture I was after.  Dare I try and mess with the recipe?  Yes I dared!  I like that I am getting confident enough to do such things.  So out went the apple and honey, in went the pears and maple syrup.  I also decided to spice up with crust on the squares with some spices that compliment both of the challenge ingredients: ginger, cardamom and a little nutmeg.

The result?  Fantastic!  They came out so well and everyone loved them.  That was more like it.  And I even got a lovely written review from one of the lovely teachers are Markinch Primary which arrived inside the tin I had sent them in:

"Your latest creation was FAB!  I'm not a fan of ginger but loved it in these cakes.  The buttery outside was really moreish - consistency was soft, moist and crumbly - lovely!  The pear and fruit was gorgeous.  I ate up all the crumbs in the tin. 10/10 Thank you."

Isn't that just so lovely?  Plus it tells you everything you need to know about how they taste, which is better than me just telling you. 


Recipe - inspired by Rachel Allen and the Kerrygold Community Recipe e-book via Baking Heaven Summer 2012
Makes about 25
  • 225g/8oz self-raising flour
  • 225g/8oz porridge oats
  • 1 tsp bicarbonate of soda
  • 1.5 tsp ginger
  • 1/2 tsp nutmeg
  • 1/2 tsp cardamom
  • 225g/8oz butter
  • 225g/8oz caster sugar
  • 90ml/3fl.oz maple syrup
  • 2 dessert pears (about 185g/6.5oz)
  • 115g/4oz raisins
  1. Preheat the oven to 180°C/350°F/Gas Mark 4 and grease and line a 23cm/9inch square cake tin with greaseproof paper.
  2. Peel, core and finely chop up the pears.
  3. In a large bowl, mix together the flour, porridge oats, bicarbonate of soda, ginger, nutmeg and cardamom.
  4. Put the butter, caster sugar and 2 tablespoons worth of the maple syrup  into a saucepan and melt over a medium heat, stirring occasionally to prevent it from getting too hot.
  5. Remove the saucepan from the heat and pour the mixture into the dry ingredients and mix to combine.
  6. Spoon half the mixture into the prepared tin and level the surface.
  7. Mix together the pears, raisins and remaining maple syrup and then distribute evenly over the oat mixture in the tin.
  8. Cover with the remaining oat mixture and smooth over.
  9. Bake for 30-35 minutes until the top is golden.
  10. Remove from the oven and allow to rest in the tin for 10-15 minutes.
  11. Remove from the tin and cut into 25 squares before placing them on a wire rack to finish cooling.

    Thursday, 10 October 2013

    Pumpkin Sandwich Cakes with Cinnamon Cream Cheese Filling


    It's the second Thursday of the month so it's time for the Lady Behind the Curtain Dessert Challenge.  This month's ingredients were pumpkin and cream cheese.

    Well, I was seriously considering not taking part this month.  I had no experience with either of the ingredients and had no idea what I would make and who would be willing to eat it.  Pumpkin seems to be a very American thing to bake with and is not very common over here in the UK (from what I've experienced anyway).  You can't get it in canned form in the supermarket, only in fruit form, and I really didn't feel like trying to scrape out the filling from one of those.  However, leave it to Pinterest to start giving me inspiration.  Just opening up the Food and Drink section started yielding several different pumpkin recipes as early as the start of September.  Clearly the stuff is even more popular over in the states than I initially thought.  But with so many options just staring me in the face I decided I would have to give something a go.  As to who would eat it, I figured if I could get them made before the autumn half term started, I could give whatever I made to the lovely ladies at Markinch Primary School via the fiancĂ©'s mum.

    I originally planned to make pumpkin fudge because it sounded really interesting to do.   Plus I want to try making more confectionery. However, I attempted it three times and all three times I failed.  The first batch burnt; the second seemed to be working until I added the final ingredient and it turned into this crumbly powder; and the final batch, whilst better than the other two, just didn't have the texture of fudge.  It was rather disappointing and I ended up with saucepans with burnt, failed fudge adhered to their bases.  It took several days to clean them all completely, which made dinner tricky since we only own 3 large-ish pots.  Really I've been needing a proper, heavy based pot for confectionery making.  Good thing I got to go to Ikea at the weekend and acquire a lovely cast iron casserole pan for half the cost one that size would usually cost then.  I cannot wait to test it out.

    Sorry, I got a little sidetracked there.  So I scrapped the fudge idea and went looking for something else I could do.  I liked the idea of biscuits but I like to make crunchy biscuits and adding wet pumpkin to it would likely not yield such a thing.  Then it hit me: whoopie pies!  They seem to get classed as biscuits (or a 'cakey cookie') but I'm leaning more on the side that they are cakes.  Cookies are not cakey.  Cake is cakey!  Hence why I've called these sandwich cakes, despite the recipe I was using referring to them as cookies.


    After the fudge disasters, this recipe ended up being really simple.  I ended up getting canned pumpkin from a seller on Amazon (who provide excellent service by the way).  The batter turned out nicely though it was a bit of a pain to get onto the trays.  I went to the trouble of smoothing them all over to make sure they came out nice and even on top, since reviews in the original recipe had complained of lumpiness.  I also made a decision to try and make them look pumpkin-like.  It was a complete experiment and I did not know if it would work.  I tested one by drawing the lines into the uncooked mixture first, putting in a clove stalk and then baking.  That worked okay but making the lines was quite fiddly.  So then I tried drawing them in after by running the sharp end of a skewer through the top just after they came out the oven.  It also worked but looked quite messy.  Finally I realised that since they were still quite soft when they came out the oven, I could just press the skewer into the top to make the pattern.  It worked really well and with the little clove stalks they made quite adorable pumpkins.
    As for the filling, cream cheese was very easy to work with and pipes really nicely.  I ended up with double the amount I needed though.  Maybe the baker of the original recipe is just really generous with their filling?  Ah well, I saved the leftovers and used it in another batch later in the week since I needed to use up the remaining pumpkin too.

    These went down really well with everyone who tried them.  I admit I was surprised since it is a bit of an out-there flavour combination but I guess the fact that it is so unbelievably popular in America should have tipped me off. 


    Recipe - adapted from Land O' Lakes
    Makes about 18

    Cakes:
    • 280g/10oz plain flour
    • 1 tsp bicarbonate of soda
    • 1/2 tsp ground cinnamon
    • 1/4 tsp ground ginger
    • 1/4 tsp ground nutmeg
    • Whole cloves
    • 1/2 tsp baking powder
    • 1/2 tsp salt
    • 200g/7oz light brown sugar
    • 170g/6oz canned pumpkin
    • 60ml/2fl.oz milk
    • 1 egg
    • 1 tsp vanilla extract
    • Orange food gel (optional)
    1. Preheat the oven to 180°C/350°F/Gas Mark 4 and line 2-3 baking trays with greaseproof paper.
    2. Remove the buds from the whole cloves, setting the stalks aside, and then crush the buds.  You want make about 1/8 teaspoon of crushed cloves.
    3. Mix the flour, bicarbonate of soda, cinnamon, ginger, nutmeg, crushed cloves, baking powder and salt together in a bowl.
    4. In a large bowl, beat together the butter and sugar until smooth and creamy.
    5. Add in the pumpkin, milk, egg and vanilla extract and beat together until well mixed.
    6. Add the flour mixture, and food gel if using, and beat until smooth.
    7. Drop level tablespoonfuls of the mixture onto the trays, spaced well apart.  Try and have an even number on each tray.  Use a spoon to make sure the dough is shaped into a neat circular mound.  Use a wet finger to smooth over the tops of each mound.
    8. Bake for 9-10 minutes until set (a skewer inserted into the centre should come out clean).  I would recommend baking them one tray at a time since you have to do the 'decoration' straight from the oven and if they cool too much it won't work.
    9. Immediately after removing a tray from the oven, use the side of a bamboo skewer to press eight lines that point towards the centre into the top of each of the cakes.  Place a clove stalk into the centre top of half of them.
    10. Transfer to a wire rack to cool.
    Filling: 
    • 200g/7oz cream cheese (I used Philadelphia)
    • 30g/1oz butter
    • 1 tsp ground cinnamon
    • 1 tsp vanilla extract
    • 1/2 tbsp milk
    • 600g/21oz icing sugar, plus extra for dusting
    1. Combine the cream cheese, butter, cinnamon, vanilla extract and milk in a bowl and beat until the mixture is well combined and smooth.
    2. Add a the icing sugar in four parts, beating well after each addition until it is nice and creamy.
    3. Spoon the filling into a piping bag fitted with a large star nozzle and pipe generous swirl on the underside of the cakes that do not have stalks in.
    4. Top each one with a stalked top piece.
    5. Dust with icing sugar.

    Tuesday, 19 February 2013

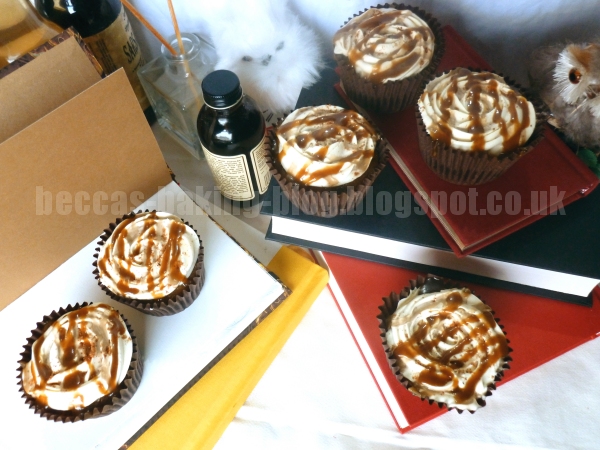
    Butterbeer Cupcakes


    I can't quite remember how these came about.  I think I was looking up what root beer was, and if it was the same as ginger beer.  There was something about the butterbeer served at Universal Studios being made with root beer and that got me interested.  If you could do a coca-cola cake, why couldn't you do one using butterbeer?  I figured I could use the Nigella recipe I discovered after my first attempt at cola cupcakes as a base and go from there.

    Hence, more research was required.  What did butterbeer taste like anyway?  Well according to J.K Rowling, butterbeer tastes "a little bit like less-sickly butterscotch", so I knew I'd need to get butterscotch in there somewhere, probably in the topping.  Then, like I said before, people who make their own butterbeer use root beer, or cream soda as a base.  But those aren't so easy to find over here so I thought I'd find a recipe that used ginger beer instead, since it is a type of root beer.  Browsing around the internet yielded a lot of results, but I settled on the one I found on The Roaming Kitchen since it incorporated ginger beer, cream and butterscotch.  It certainly looked the best and used things I thought my tasters would like.

    So I took that recipe and made the "beer" part to add to the Nigella recipe in place of Cola.  I chose to leave out the rum though, mainly because I'm not a drinker of alcohol and therefore don't keep anything like that in my house.  I switched the golden caster sugar to light brown sugar, since butterscotch cake usually uses that, and left out the cocoa powder in favour of some extra ground ginger.  Putting some of the butterscotch sauce into the cake batter just before baking was a last minute decision but seemed to pay off. 

    I was rather pleased with the final result.  However, I discovered that the butterscotch sauce I put on top kinda vanished into the cream overnight in the fridge, and I had to make some more so it actually showed up in the photos and would be there for the people eating them.  So really, you want to add that bit just before you serve.

    The cake was really moist, and tastes like ginger beer, which was good.  You even get the ginger beer after taste.  The cream is lovely, especially with the nutmeg and the butterscotch sauce just brings it together with a nice sweet edge.  The fiancĂ© really liked them.


    Recipe - adapted from The Roaming Kitchen and How to be a Domestic Goddess
    Makes about 12


    Butterscotch Sauce:
    Makes about 180ml/6fl.oz
    • 55g/2oz butter
    • 85g/3oz dark brown sugar
    • 125ml/4.5fl.oz double cream
    • 1/2 tsp fine sea salt
    • 1.5 tsp vanilla extract
    1. Put the butter in a saucepan and melt over a gentle heat.
    2. Add the sugar, cream and salt and whisk together.
    3. Bring to the boil and cook for 5 minutes, whisking the whole time.
    4. Bring off the heat when the butterscotch has thickened enough to coat the back of a spoon.
    5. Add vanilla extract and stir in.
    Butterbeer:
    • 1/2 tbsp butter
    • 3/4 tbsp light brown sugar
    • 1/4 tsp ground nutmeg
    • 1/2 tsp ground ginger
    • 1 tsp vanilla extract
    • 175ml/6fl.oz ginger beer
    1. Put the butter in a saucepan and melt over a medium heat.
    2. Add the sugar, nutmeg, ginger and vanilla and mix together.
    3. When the mixture is starts bubbling, add in the ginger beer, lower the heat and stir.
    4. Remove from heat after the ginger beer has heated through (about 2 minutes).
     
    Cupcakes:
    • 125ml/4.5fl.oz milk
    • 1/2 tsp lemon juice
    • 250g/9oz light brown sugar
    • 200g/7oz plain flour
    • 1/2 tsp bicarbonate of soda
    • 1/4 tsp salt
    • 125g/4.5oz butter
    • 175ml/6fl.oz butterbeer
    • 1 tsp ground ginger
    • 1 large egg
    • 1 tsp vanilla extract
    • Butterscotch sauce
    • 250ml/9fl.oz double cream
    • Ground nutmeg for dusting
    1. Preheat the oven to 180°C/350°F/Gas Mark 4 and line a 12 hole muffin tin with muffin cases. 
    2. Put the lemon juice and milk in a jug and leave for 10 minutes.
    3. Mix the sugar, flour, bicarbonate of soda and salt together in a large bowl.
    4. Melt the butter in a saucepan over a low heat with the butterbeer and ground ginger.
    5. Add butterbeer mixture to the dry ingredients and mix in. 
    6. Add the egg and vanilla extract to the lemon milk and beat together.
    7. Add to the other ingredients, mixing until smooth.
    8. Divide the mixture amongst the cases, filling them about 2/3 of the way up.
    9. Add a small spoonful of butterscotch to the centre of each case of mixture.
    10. Bake for about 20-25 minutes until the butterscotch is bubbling and the rest of the cake is risen and springy to the touch.
    11. Leave to cool on a wire rack.
    12. Whip the cream until it holds its shape in stiff peaks.  
    13. Put the cream into a piping bag fitted with a closed star nozzle and pipe a spiral on top of each cake, starting at the centre and moving outwards so you get something that looks like a rose.
    14. Sprinkle each cake with a little nutmeg.
    15. Just before serving, put the remaining butterscotch sauce into a piping bag fitted with a small, round nozzle and pipe a zigzag pattern across the top of each cake. (If the butterscotch has firmed up a bit too much, place back over a low heat and whisk until it becomes runnier again).