Sunday, 31 March 2013

Strawberry and Cream Cake


Easter is the fiancé's mum's New Year.  The clocks have gone forward, making the days longer; the weather is usually brighter and warmer and she can put up the summer curtains.  She also insists on having her children over for lunch, and now me by extension.  Being the avid baker I was charged with dessert and could make whatever I wanted.  Well I really didn't know what I wanted to do except that it would be something I'd not made before.  And vaguely spring/summery, to reflect the changing seasons.

I had a look through my cupboards to see what I had and see if it sparked any ideas.  As often happens when I open my cupboard, something fell out: one of the packets of freeze dried strawberry powder I had bought to use in my quest for strawberry extract alternatives.  Well there was an idea.  A strawberry cakes.  Strawberries are quite a summery thing.  And what else does one think of when they have strawberries?  Why, cream of course.  There.  Strawberry and cream cake.  That should be fine.

However, I wasn't sure how to go about adding the strawberry powder to a cake.  Would it be like with cocoa where you supplement some in place of flour?  Should I rehydrate it first?  Obviously the safest answer was to look it up and see if I could find a recipe that used it.  Which clearly I did find and it was a vegan recipe too, which is cool.  Of course I ruin that by covering it with cream.  As far as I can tell, from this recipe and from comments on various forums, you just add the powdered strawberry to a white cake recipe, with a little liquid of some kind, like strawberry extract or reduced strawberry purée.  This recipe uses strawberry extract as its liquid, which I cannot get here in the UK (hence why I have my quest).  So I made a strawberry purée, since I had strawberries in my fridge (I bought them to use for decoration but didn't end up going with that idea in the end).  


I may have got a bit carried away with icing this cake.  Ages ago I saw several pictures of cakes covered in buttercream roses.  They all looked so pretty and though this cake is not particularly tall I wanted to give it a try.  And just to make it a bit more interesting, I wanted to have a gradient colour change running from the centre to the base.  Whipping the cream and icing the cake took about 40 minutes as a result but the final outcome did look so beautiful.  I was very proud.

The overall result was a very beautiful cake that tasted like strawberries with cream.  The only problem though is that it had quite a close texture and as a result was a little 'gummy'.  The fiancé said it was a bit like a fruit roll, only better.  Despite that though, everyone seemed to really enjoy it and a vast majority of it got eaten.


Recipe - adapted from My Vegan Cookbook
Whilst the cake itself is a vegan recipe, my decision to use cream to decorate it means I've essentially ruined that.  So if you want a fully vegan cake, use a vegan alternative for the cream.  A lot of places I've seen use whipped coconut cream. 
  • 290g/10oz plain flour
  • 180g/6.5oz caster sugar
  • 1/2 tsp salt
  • 1.25 tsp baking powder
  • 1/2 tsp bicarbonate of soda
  • 75g/3oz freeze dried strawberry powder
  • 330ml/11.5fl.oz water
  • 30g/1oz butter
  • 2 tbsp sunflower oil
  • 115g/4oz strawberries
  • 1 tsp lemon juice
  • Pink food colouring
  • 450ml/16fl.oz double cream (or coconut cream for fully vegan cake)
  1. Preheat the oven to 180°C/350°F/Gas Mark 4 and grease and line 20cm/8inch round cake tin.
  2. In a large bowl, mix together the flour, sugar, baking powder, bicarbonate of soda and freeze dried strawberry powder.
  3. Blitz the strawberries to a purée and run through a sieve into a saucepan.
  4. Reduce the strawberry purée over a medium heat until you are left with about half.  You should have about 1.5 tbsp worth of purée.
  5. Melt the butter.
  6. In a small bowl, combine the water, oil, melted butter, lemon juice, strawberry purée and a few drops of food colouring.
  7. Add the wet ingredients to the dry and mix together gently with a spoon until combined.  
  8. Spoon the mixture into the prepared tin and level out.
  9. Bake for 30-35 minutes or until a skewer inserted into the centre comes out clean.
  10. Allow to sit in the tin for about 10 minutes and then transfer to a rack to finish cooling.
  11. Whip the cream until you get stiff peaks.
  12. Spoon about a quarter into a piping bag fitted with a large closed star nozzle.  
  13. First pipe a large rose in the centre of the cake, then pipe a circle of smaller roses around it.  It doesn't matter if there are gaps between roses, fill these by holding the nozzle perpendicular to the cake and squeezing out just a little cream to create a small flower shape.
  14. Squeeze any cream left in the bag back into the bowl and add a few drops of pink colouring.  Fold in carefully so you have a slightly pinkish cream.  If there are obvious streaks of colouring running through it doesn't matter since it adds to the effect.
  15. Pipe another circle of roses around the outside of the first circle.  These ones should be pretty close to the edge.  Fill any gaps between the roses in the same manner as before.
  16. Repeat step 14.  You should now have a darker pink cream.
  17. Pipe roses around the side of the cake and fill in all gaps along the top edges, base and between roses with small cream flours.

Chocolate and Mini Egg Cookies


So these are the other biscuits I made.  Unfortunately I didn't end up getting very good photos, which annoys me.  

Anyway, the biscuits for the elder of my two brothers took the longest to decide upon.  Given he eats pretty much anything this is rather weird.  You'd think he'd be the easiest.  I eventually settled on chocolate biscuits but wanted to add something too them because otherwise they didn't seem as fancy as the others.  I considered fudge and toffee, since he likes those, but went with Mini Eggs since these were a gift for Easter.

Currently I have no feedback on these biscuits (I didn't try them since I don't like chocolate biscuits) so will add that later.

Recipe - adapted from Cookie Jar
Makes about 15
  • 125g/4.5oz butter
  • 175g/6oz caster sugar
  • 1 egg
  • 1/2 tsp vanilla extract
  • 125g/4.5oz plain flour
  • 35g/1.25oz cocoa powder
  • 1/2 tsp bicarbonate of soda
  • 40g/1.5oz Mini Eggs
  1. Preheat the oven to 180°C/350°F/Gas Mark 4 and line 2-3 trays with greaseproof paper.
  2. Beat the butter and sugar together in a bowl until pale and fluffy.
  3. Lightly beat the egg and add to the sugar butter with the vanilla extract and mix until smooth.
  4. Sift in the flour, cocoa powder and bicarbonate of soda and crush and add the Mini Eggs.  Mix well to combine.  You'll get a sticky dough.
  5. Dampened you hands and roll walnut sized pieces into balls and space well apart on the trays.
  6. Bake for 10-15 minutes, remove from the oven and then allow to sit on the trays for 5 minutes before transferring to a wire rack to cool.

Eggless Chocolate Chip Cookies


So last week there was a knock at the door mid afternoon.  The fiancé goes to answer it and comes back with a box addressed to me.  Me getting parcels is not strange.  I do a lot of my shopping online.  However I hadn't ordered anything recently, and certainly not something that warranted a box of this size or shape.  Confused but curious I opened it.  Turns out my lovely sister had sent me and the fiancé an Easter gift in the form of a box full of different Lindor truffles, which was quite wonderful.  However, this got me wanting to send something back to her but since I'm trying to be more careful with my money I didn't really want to buy expensive Easter chocolate.  I did however have a cupboard full of baking ingredients and we had recently discussed biscuits on our last Skype chat.  But if I'm sending her biscuits then I obviously have to send biscuits to my brothers and Dad and his partner too.  Otherwise it wouldn't be fair.  So I spent all of Tuesday evening baking four different types of biscuits.  My sister had mentioned Vienesse Fingers in our chat, so I mad her some of those though I piped them into egg shapes.  For my Dad and his partner, I made orange shortbread covered in chocolate.

My two brothers though...I wasn't really sure about them.  The elder eats pretty much anything and in the end I settled on a chocolate biscuit (which I will post soon) but the younger is picky.  Ridiculously so.  Even about sweet things.  He doesn't like ice cream or cake or anything like that.  Did he even like biscuits?  It was a while before I remembered that he had mentioned there was one type of biscuit he likes: Maryland Chocolate Chip Cookies.  They are rather scrumptious cookies.  There has been many an occasion where I have eaten a whole pack of them in one sitting without realising.  So I went looking for a copy-cat recipe, which found one.  Or at least one that claimed to be one.  I figured it was worth a shot.

Well, the final result didn't taste like Maryland Cookies.  They were still nice though.  My honest analysis of the taste is that they are like gingerbread but without the ginger.  The fiancé agrees with this.  I think it's the golden syrup in the recipe.  You can taste it.  They are not a particularly crunchy biscuit either.  I'm glad I flattened them before baking because otherwise they wouldn't have been flat and would have been even softer.  Not that they were that soft.  Just not as crunchy and crumbly as I would have liked.  We enjoyed them though.  Quite a lovely biscuit.  And no eggs in this one either.


Recipe - adapted from Allrecipes
Makes about 30

  • 165g/6oz vegetable shortening or margarine (not butter, I used Stork)
  • 1/4 teaspoon salt
  • 75g/3oz caster sugar
  • 4 tbsp golden syrup
  • 2 tsp milk
  • 1 tsp vanilla extract
  • 260g/9oz plain flour
  • 1.5 tsp bicarbonate of soda
  • 100g/3.5oz milk chocolate chips
  1. Preheat the oven to 180°C/350°F/Gas Mark 4 and line 2-3 baking trays with greaseproof paper.
  2. In a large bowl mix the shortening/margarine with the salt and sugar until pale and fluffy.
  3. Add in the golden syrup, milk and vanilla extract and mix in.
  4. Add the flour, bicarbonate of soda and chocolate chips and mix until just combined.
  5. Shape teaspoonfuls of mixture into balls and then flatten and place on the trays.
  6. Bake for 10-15 minutes until the edges of the biscuits start to turn golden.
  7. Remove and let sit on the tray for 5 minutes before transferring to a wire rack to finish cooling.

Friday, 29 March 2013

Easter Nest Torte


This is something that I've been wanting to make since I got my Cadbury recipe book.  It just looked so cool and would be a little more challenging than my usual bakes.  I had to wait until Easter rolled around again though, since it is an Easter bake after all.  Then, as I've been back volunteering at Markinch Primary again I thought it would be nice to make it for the teachers there.  

The torte consists of a layer of chocolate cake topped with a layer of chocolate mousse,  surrounded by a collar of dark chocolate and then decorated with chopped milk chocolate and Mini Eggs to look like a nest.  The things I was most nervous about doing were the chocolate collar and the mousse.  I've never used gelatine before and the last time I tried to make a chocolate case, I couldn't remove the paper without them falling apart.  I did learn from my previous failure though and made sure that the chocolate was quite thick all along the length of the paper.  And it worked out perfectly.  I was very pleased.  The mousse also turned out to be no trouble at all.  I've had plenty of practice making custard and gelatine is surprisingly simple to use.  The only problem I had came from the fact that I didn't have a tin the right size and had to use a slightly smaller one.  This meant when I added the mousse, there was slightly too much for the width of the cake and the height of the collar.  But all things considered, that was quite good in terms of all the things that could have gone wrong.

The reaction I got to it was wonderful.  Everyone thought it looked amazing.  The mousse was deliciously creamy and smooth and the cake was very moist and chocolatey.  It did not last that long at all. 

And on a side note, today marks one year since I posted my first recipe on this blog.  Yay!


Recipe - adapted from Simply Cadbury's Chocolate

Cake:
  •  75g/3oz self-raising flour
  • 1/4 tsp baking powder
  • 40g/1.5oz cocoa powder
  • 125g/4oz unsalted butter
  • 125g/4oz caster sugar
  • 2 eggs
  • 4 tbsp orange juice
  • 75g/3oz Cadbury's Bournville chocolate
  1. Preheat the oven to 180°C/350°F/Gas Mark 4 and line a 23cm/9inch (or 20cm/8inch  like I used) round cake tin.
  2. Sift the flour, baking powder and cocoa powder into a large bowl.
  3. Add the butter, sugar and eggs and beat together until the mixture is smooth and creamy.
  4. Spoon the mixture into the prepared tin and level it out.
  5. Bake for 20-25 minutes until the cake has risen and the top is just firm.
  6. Remove from the tin and allow to cool on a wire rack.
  7. Once cool, transfer to the plate you intend to serve it on and then drizzle with the orange juice.
  8. Melt the chocolate in a heatproof bowl over a saucepan of gently simmering water.
  9. Meanwhile, use a piece of string or a measuring tape to measure the circumference of the cake.
  10. Cut out a strip of greaseproof paper which is 1cm/0.5inches longer than the length you measured and 6cm/2.5inches tall.
  11. Coat the strip with the melted chocolate, covering it right up to one short and one long side.  Leave the additional 1cm/0.5inches free of chocolate and along the other long side shape a wavy pattern which is about 1.5cm/0.75inches from the top.
  12. Allow to firm up slightly, so that the chocolate has thickened and is no longer runny.
  13. Carefully place the strip around the cake, with the wavy shape at the top.  Make sure the base of the strip touches the plate and the two short ends match up.  Press against the cake to make sure there are no gaps between it and the chocolate collar or the filling will escape.
  14. Chill in the fridge.

Mousse:
  • 2 tsp gelatine
  • 2 tbsp cold water
  • 3 egg yolks
  • 50g/2oz caster sugar
  • 1 tsp cornflour
  • 300ml/10.5fl.oz milk 
  • 200g/7oz Cadbury's Bournville chocolate
  • 300ml/10.5fl.oz double or whipping cream
  1. Place the water in a small bowl and sprinkle the gelatine over it.  Set aside.
  2. In a separate bowl beat the egg yolks with the sugar, cornflour and a little of the milk.
  3. Heat the remaining milk in a saucepan until it just reaches boiling point.
  4. Slowly pour the milk over the egg yolk mixture and whisk together until well combined.
  5. Put back into the saucepan and place over a gentle heat, stirring all the time until the mixture has thickened enough to coat the back of the spoon.  Do not allow it to boil or you'll end up with scrambled eggs.
  6. Remove the custard from the heat and stir in the gelatine until it dissolves.
  7. Break up the chocolate and add it to the custard.  Allow it to melt and then stir until smooth.
  8. Turn into a bowl, cover with greaseproof paper and leave to cool until it starts to thicken. 
  9. Whip the cream until you get soft peaks.
  10. Remove the greaseproof paper from the chocolate mix and then fold the cream into it.
  11. Pour the filling ontop of the cake and smooth out.
  12. Chill in the fridge for 1-2 hours until it has set.
Decoration: 
  • 150g/5oz Cadbury's Dairy Milk chocolate
  • 40g/1.5oz Mini Eggs
  1. Use a sharp knife to chop the chocolate into shards.
  2. Remove the greaseproof paper carefully from around the cake's chocolate collar.
  3. Place the chocolate shards around the edge of the top of the cake.
  4. Cover the rest of the top of the cake with a pile of Mini Eggs.
  5. Keep chilled until ready to serve.

Wednesday, 27 March 2013

Cadbury's Creme Egg Cupcakes

 
There are a lot of posts to get done this week.  So far, I've got four to do including this one but since I've been asked to make something for Easter lunch on Sunday there'll be five in total.  Best get a move on.

I shall start the updates with the usual Monday cupcake bake for the fiancé to take with him when he goes to Dundee.  As has been the case over the last few weeks, I once again had not given much thought to what I wanted to make until the night before.  Since Easter is coming up I wanted to do something along that theme as next week there are no cupcakes to take since the fiancé is going there straight from work.  I found my inspiration on Pinterest.  Completely by accident mind as I wasn't even browsing the Food category.  Creme Egg cupcakes!  However, the recipe linked used actual Creme Egg filling in the icing.  Well, you know me: I like making everything from scratch.  So off I went in search of a copy-cat recipe for the fondant, which I eventually found on Sticky Pinny.  In fact, she had an entire Creme Egg cupcake recipe right there which looked very cool.  The overall appearance of them was awesome.  I didn't want to do it like that though.  I wanted to put my fondant inside a chocolate cake, not on top, so it would be like an actual Creme Egg.  I also steer clear from cream cheese frostings, since the fiancé hates cheese (though I will tackle them one of these days), and I preferred to try and make the cake taste as much like Cadbury Dairy Milk as I possibly could and so didn't want to use the Devil's Food Cake base either.  

Hence I went searching for a different cupcake recipe to use as a base.  My main requirement was that it used actual chocolate in the recipe, not cocoa powder.  I then had a brainwave!  If I could find a recipe that also used a good amount of milk, I could put the Cadbury's drinking chocolate powder in it and make milk chocolate milk!  With those two conditions in mind I did eventually find one that I liked the look of.  I found it on GoodToKnow, but it comes from the Primrose Bakery.

The final thing to decide on was the topping but eventually I settled on milk chocolate buttercream, also flavoured with Dairy Milk.  So from the outside it just looks like a chocolate cake but then you bite into it and find the gooey egg centre.

They were quite the success indeed!  My tasters said they tasted just like Creme Eggs but in cake form.  The cake and buttercream tasted like Dairy Milk and the filling like Creme Egg filling.  However they were quite a heavy cake and the fiance said the buttercream is so indulgent that they could only manage to eat one each.  I personally did not think the filling tasted like Creme Eggs.  It was almost too sweet and I could taste the golden syrup in it.  But that's just me apparently.


Recipe - makes 15

Cakes - recipe adapted from the Primrose Bakery via GoodToKnow:
  • 250ml semi-skimmed milk
  • 1 x 11g packet Cadbury's Highlights Chocolate Instant
  • 1/2 tsp vanilla extract
  • 115g/4oz Cadbury's Dairy Milk chocolate
  • 85g/3oz unsalted butter
  • 175g/6oz dark brown sugar
  • 2 large eggs
  • 185g/6.5oz plain flour
  • 3/4 tsp baking powder
  • 3/4 tsp bicarbonate of soda
  • Pinch of salt
  1. Preheat the oven to 190°C/375°F/Gas Mark 5 and line 15 holes of muffin tins with muffin cases.
  2. Put the milk in a jug and stir in the packet of Cadbury Highlights until it dissolves.  
  3. Stir the vanilla into the milk and then set aside.
  4. Melt the chocolate in a heatproof bowl over a saucepan of gently simmering water.  Leave to cool slightly.
  5. Beat the butter and sugar together in a large bowl until it is pale and creamy.
  6. Separate the eggs, putting the yolks and whites into different bowls.
  7. Beat the yolks for a few minutes and then add to the sugar butter a little at a time, beating in after each addition.
  8. Stir in the melted chocolate.
  9. Sift the flour, baking powder, bicarbonate of soda and salt together into a bowl.
  10. Add the flour mix to the cake batter, alternating it with the milk and stirring in after each addition.  
  11. Whisk the egg whites into soft peaks and then slowly fold into the cake mixture.  Keep folding until you see no bits of white.  The resulting mixture will be runny but smooth.
  12. Fill the cases three quarters full with the mixture and then bake for 20-25 minutes until risen and tops are springy. 
  13. Leave in the tins for 10 minutes before transferring to a wire rack to finish cooling.

Fondant Filling - adapted from Sticky Pinny:
  • 170g/6oz golden syrup
  • 60g/2oz butter
  • 375g/13oz icing sugar
  • 1 tsp vanilla extract
  • 1/4 tsp salt
  • 1 tbsp water
  • Yellow/orange and white food colouring gel/powder
  1. Beat the golden syrup, butter and icing sugar together in a bowl with an electric whisk until smooth.
  2. Add in the vanilla extract, salt and water and mi until well incorporated.
  3. Transfer a third of the mixture to a different bowl and colour with the yellow/orange food colouring to it.
  4. Use the white colouring on the remaining two thirds.  You don't need to make it completely white, just noticeably paler than the yellow.
Buttercream:
  • 175g/6oz butter
  • 340g/12oz icing sugar
  • 150g/5.3oz milk chocolate
  • 1 tbsp milk
  1. Melt the chocolate in a heatproof bowl placed over a saucepan of gently simmering water.
  2. Beat the butter until it is really creamy.
  3. Sift in the icing sugar, add the milk and beat until smooth.
  4. Pour in the chocolate and beat until evenly distributed through the mix.
Assembly:
  1. Use a knife and cut a core out of the middle of each cupcake.
  2. Put a small amount of yellow fondant into the hole you have made then fill in the rest with white fondant.
  3. Replace the core.
  4. Put the buttercream in a piping bag fitted with a large star nozzle and pipe a swirl on top of each cake.  Make sure to cover the entire top and mask the seams of the core and any filling that may have escaped.

Thursday, 21 March 2013

Sherbet Lemon Cupcakes


So once again Monday rolled around and I realised I hadn't put any thought into the cakes for Tuesday.  Since I was supposed to be working in the afternoon I wanted to get the cakes done in the morning so I could then spend the evening with the fiancé.  This meant that what I really wanted was something quick and easy that would still be a new recipe.  Then I remembered that for the longest time I have been wanting to make cakes based on sherbet lemons but had kept putting it off due to not having sherbet.  Honestly, it's mainly because I wanted to make my own sherbet but was having trouble getting hold of either citric or tartaric acid.  I do have some now, but didn't feel like making it from scratch this time around.  However, I had picked up a few Mega Rainbow Dusts, as well as packets of Flying Saucers back when I was doing my fireworks cupcakes.  I just chose not to use them in the end and they've been sitting in my cupboard ever since.  So I figured I would break them out and use those instead.

I figured I'd work off my standard vanilla cupcake recipe, but switched out the vanilla for lemon.  However, I did want my cakes to be a little moister and so tampered with the recipe slightly by adding a bit of milk, plus some bicarbonate of soda to help it rise.  I also decided to make a lemon syrup to pour over the cakes since I've had quite positive responses to cakes moistened in this manner.  The buttercream was also flavoured with lemon, but I added the sherbet from the Mega Rainbow Dust to it as well to give it a little kick.  I then cut up the Flying Saucers, tipped their sherbet into a bowl and smooshed it with a spoon to break it up before sprinkling it over the top of the cakes to finish them off.  Quick and easy.

And delicious.  They were really really nice!  Lovely and lemony, especially with the added syrup running through them.  You could taste the sherbet in the buttercream but it wasn't too overt so it all melded together really nicely.  The fiancé enjoyed them and I really wish I'd been able to get more than a couple of bites from the spare one I had.  Ah well, maybe next time.


Recipe - makes 12


Cakes:
  • 115g/4oz butter
  • 115g/4oz caster sugar 
  • 1 tsp lemon extract
  • 2 eggs
  • 40ml/1.5fl.oz milk
  • 115g/4oz self-raising flour
  • 1/4 tsp bicarbonate of soda
Lemon Syrup:
  • 3 tbsp granulated sugar
  • 3 tbsp lemon juice
Lemon Buttercream:
  • 115g/4oz butter
  • 200g/7oz icing sugar
  • 40g/1.5oz sherbet, plus extra for dusting
  • 1 tsp lemon extract
  • Yellow food colouring 
  1. Preheat the oven to 180°C/350°F/Gas Mark 4 and line a 12 hole muffin tin with cupcake cases.
  2. Beat the butter, sugar and lemon extract together until smooth, creamy and pale.
  3. Add the eggs one at a time, mixing in after each addition.
  4. Add the milk and stir in.
  5. Sift in the flour and bicarbonate of soda and fold into the mix until just incorporated.
  6. Divide the mixture evenly amongst the 12 cases, aiming for each to be about three quarters full.
  7. Bake in the oven for 18-20 minutes, until cakes have risen and are springy to touch.
  8. Whilst cakes bake, combine the granulated sugar and lemon juice together to make the syrup.
  9. Remove cakes from oven, transfer to a wire rack and use a skewer to poke about 5 holes in each one.
  10. Pour about half a teaspoon of syrup over each cake, spreading it across the tops.  Aim to use all the syrup.
  11. Leave cakes to cool.
  12. In the meantime, make the buttercream by first beating the butter until creamy.
  13. Sift in the icing sugar and beat until smooth.
  14. Add the lemon extract, food colouring and sherbet and mix until combined.
  15. Place buttercream into a piping bag fitted with a large star nozzle and pipe a swirl on top of each cooled cake.
  16. Dust with sherbet.

Sunday, 17 March 2013

Chocolate and Biscuit Fridge Cake


When I was younger, in single digits and during the late nineties, I liked to watch Blue Peter.  And I distinctly remember there being some sort of chocolate and biscuit thing that was mixed up and put in the fridge to set.  It was one of the few things that I copied down from ceefax (since this was before the internet was very common) and made, and LOVED.  Well over a decade later I have been seeing refrigerator cakes (or hedgehog slice) on a few blogs and it reminded me of it.  Could I find the original recipe though?  No.  An incredibly thorough search did not yield a result that I recognised since I never put fruit or nuts or anything much beyond biscuits and chocolate in it.  Or golden syrup because as a child I was very against golden syrup.  Still am.  It's too sweet.  But every recipe I find has all these things in.  It was quite sad, because I really wanted to recreate it.

Then I was flicking through my Cadbury's cookbook (a birthday present from my lovely friend Jess last year) and saw it!  A no-bake, fridge cake that only had chocolate, biscuits and butter in it.  No fruit, no nuts and no golden syrup!  Well I was so happy and immediately knew I would be making it once my grocery shopping was delivered.  And I did.  I admit I changed a couple of things.  Firstly, I made a slightly smaller version of it because I wasn't keen to use up so much chocolate in case it was a disaster.  Secondly, I changed the dark for chocolate for milk chocolate, since I do not like it, and finally, used chopped chocolate in place of chocolate buttons.

Man it is good!  Definitely like what I remember.  And the lack of golden syrup makes it so much less sweet than the last one I attempted to make.  Also, it tastes amazing with vanilla ice cream.  Such a fantastic treat to end dinner on.  Yum yum.

It does amuse me that my 100th post for this blog (though not the 100th recipe) is a no-bake cake.


Recipe - adapted from Simply Cadbury's Chocolate 
Makes a 15cm/6inch cake

  • 275g/9.5oz milk chocolate
  • 20ml/1fl.oz milk
  • 85g/3oz unsalted butter
  • 85g/3oz digestive biscuits
  • 75g/2.5oz white chocolate
  1. Grease and line a round 15cm/6inch cake tin, preferably one that has a removable base.
  2. Chop up 75g/2.5oz of milk chocolate and all the white chocolate into small-ish pieces and put in a bowl.
  3. Break up the digestives and mix in with the chocolate pieces.  Set aside. 
  4. Melt the remaining 200g/7oz of the milk chocolate with the milk in a large glass bowl placed over a pan of just simmering water.
  5. At the same time, melt the butter in a separate pan.
  6. When the chocolate has melted, stir in the butter and whisk until smooth. 
  7. Let the mixture cool but do not let it start to solidify.
  8. Mix in the biscuits and chocolate until distributed fairly evenly, then turn into the prepared tin and pack it down gently with a spoon.
  9. Put in the fridge to chill for at least 3 hours (I left mine overnight).
  10. Remove from the tin, peel off the paper and transfer to a plate.  Store in the fridge.

Tuesday, 12 March 2013

Chocolate and Rose Cupcakes


So Sunday rolled around again and I realised I hadn't decided on what type of cakes I wanted to make for Tuesday.  I wasn't doing a big shop this week so I had to make sure I picked something that didn't require anything special in it.  It had to be in my cupboard or be something I could get from the local shop (which ended up being cocoa powder because I had run out).

I actually got the idea from my biscuit book, which has a recipe for Turkish Delight biscuits.  It made use of marshmallow and rose sugar and so I thought maybe I could make a cake based on Turkish Delight.  I did have rose extract in the cupboard after all.  But what flavour of cake to do?  I was going to use the rose in the topping, and possibly for a filling, but what to accompany it with?  Then I came to the logical conclusion of chocolate cake!  You get a sweet called Fry's Turkish Delight, which is rose Turkish Delight surrounded by chocolate.  So chocolate must be a good accompaniment.  I decided to check by seeing if there were recipes that used rose and chocolate together and turns out there's lots.  I ended up using one for the chocolate cake part of these cupcakes, though theirs had rose in the cake too.  I chose to leave it for just the decorative part.  I also liked the recipe for being egg free, though my choice of filling means the whole thing is not completely egg free any more.  Oh well.  I can save it to use again.


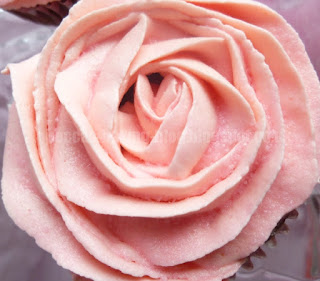
So I had the cake recipe and I knew rose would flavour whatever I topped it with.  Now, the biscuit recipe used marshmallow.  Therefore I thought I would use marshmallow fluff, and just swap out the vanilla in the recipe I use for rose.  But then I decided I want to fill the cakes, so as to be more reminiscent of the sweet.  So rose marshmallow fluff would fill it.  Should I also top it with it?  There was a fair bit of uhmming and ahhing before I decided that, no, I would make a rose buttercream to top instead.  And since I got a large, closed star nozzle at Christmas, I would pipe roses on top!  Add pink cases and voilà!  It was a very pretty result indeed.

It tasted good as well.  I will admit, when I first tried the rose buttercream it was a bit odd.  My brain couldn't comprehend that it tasted like the smell of roses.  Strange I know but the same thing happened to the fiancé.  But the more of it I tried, the more I liked it.  So apparently it's one of those flavours that grows on you.  Grows quickly though.  It also went well with the chocolate.  I'm not a fan of chocolate cake, but even I thought it was lovely accompanied by the rose.


Recipe - makes 12

Cakes - adapted from the Food Network
  • 175ml/6oz skimmed milk
  • 3/4 tsp apple cider vinegar
  • 140g/5oz self-raising flour
  • 20g/0.7oz cocoa powder
  • 1/4 tsp baking powder
  • 1/2 tsp bicarbonate of soda
  • 1/4 tsp salt
  • 3/4 tsp cornflour
  • 35ml/1.25fl.oz sunflower oil
  • 1/2 tbsp double cream
  • 120g/4oz sugar
Rose Marshmallow Fluff - adapted from Bake me I'm yours...Sweet Bitesize Bakes
  • 1 large egg white
  • 125g/4.5oz caster sugar
  • 25g/1oz golden syrup
  • Pinch of salt
  • 1/4 tsp cream of tartar
  • 1 tbsp water
  • Rose extract
  • Pink food colouring   
Rose Buttercream:
  • 115g/4oz butter 
  • 225g/8oz icing sugar, plus extra for dusting
  • Rose extract
  • Pink food colouring
  • 1/2 tbsp water
  1. Preheat the oven to 180°C/350°F/Gas Mark 4 and line a 12 hole muffin tin with cupcake cases (smaller than muffin cases).
  2. Put the milk and apple cider vinegar in a jug, mix and let sit for about 15 minutes until it starts to curdle.
  3. Sift the flour, cocoa powder, baking powder, bicarbonate of soda, salt and cornflour together into a bowl and set aside.
  4. Whisk the vinegar milk into the oil and cream in a large bowl for about 5 minutes.
  5. Add the dry ingredients to the wet in three stages, mixing them in gently and only until they're just incorporated with no large lumps.
  6. Divide the mixture amongst the cases, filling them about halfway.
  7. Bake for 20-25 minutes until risen and springy, and a skewer inserted into the centre comes out clean.
  8. Leave on a wire rack to cool.
  9. Make the marshmallow fluff by putting a heatproof bowl over a saucepan of simmering water.
  10. Place everything for the marshmallow fluff except the rose extract and food colouring in the bowl.
  11. Whilst it is heating, stir with an electric whisk for several minutes (about 10) until you get shiny peaks.
  12. Remove from the heat and whisk for another two minutes to thicken it up.  
  13. Add the food colouring and whisk in too.
  14. Mix in a few of drops of rose extract at a time until you get the intensity of flavour you want.
  15. Allow to cool.
  16. Make the buttercream by blending all the ingredients except the extract together until smooth.
  17. As with the marshmallow fluff, add a few drops of rose extract at a time until you get a flavour you are happy with.
   
Assembly:
  1. Put the marshmallow fluff into a piping bag fitted with a large, round nozzle.  Put the buttercream in one fitted with a large, closed star nozzle.
  2. Use a knife to cut a large core out of the centre of the cake.  Do not throw away.
  3. Fill the hole with marshmallow fluff then push the core back into place.  It doesn't matter if it spills over or looks messy, you're going to hide it with the buttercream.
  4. Position the nozzle of the buttercream bag perpendicular to the cake, starting in the centre.  Slowly pipe a swirl that moves outwards from the centre, tilting the nozzle so it faces the starting point, and slightly increasing the pressure as you get further out to make bigger 'petals'.  You should get a rose.
  5. Dust with icing sugar.

Saturday, 9 March 2013

Lemon Burst Cookies


The weather here in Markinch has been so miserable the past few days.  It's hard to believe that last weekend was so wonderfully sunny that I was able to get all the laundry washed and dried because I could hang it outside.  Now it's dark and grey and raining.  Very much stay-indoors-and-hide weather.  I really love sunshine though so wanted something to brighten up my day.  And what better than some lemony yellow cookies?

Lemon burst cookies were something I found ages ago that I really liked the look of.  Problem was that every recipe I encountered for them used boxed cake mix and, as you may know by now, I don't like using boxed mix.  I want to do everything from scratch.  So they've been put to one side until I could find a recipe that didn't 'cheat', since I haven't yet figured out exactly what would make up a box cake mix.  Then a couple of days ago, on one of my daily trawls of Pinterest, I found a pin of the cookies that labelled it 'from scratch'.  And they were!  It was indeed a blog post by someone who had been in the same situation as me but had actually managed to find what we had been looking for.  Well, as soon as I saw it I knew I would have to make them at the next possible opportunity, which was yesterday.


It is quite an easy recipe to follow, though I did make a couple of alterations.  Firstly, I didn't have any lemons in the house, so I just increased the amount of lemon extract used.  I also added some yellow food colouring to brighten the biscuits up a bit.  I did end up with a sticky dough though.  Partly due to the increase in liquid extract added, but mainly I think because of the eggs.  As I mentioned in previous posts, egg sizes vary between here in the UK and in the US, where this recipe is from.  2 large eggs in the US is more like 2 mediums over here.  I only have large though (extra large in the US).  So I put in two of those, even though I'm well aware of the size difference.  But I don't buy medium so what else was I going to do?  I guess I could have changed it to one egg...or measured it in a jug...but I didn't.  I compensated a little by adding two tablespoons of icing sugar to the batter and really the final result was fine.  I could still roll the dough and they still looked like I expected them to.  So no harm done.

The final result was really good!  These are a soft cookie, which I was expecting given they're originally made with cake mix.  But the lemon running through it is just such a nice pick me up.  And they are sweet too.  Everyone I've given one to so far has really liked them and quickly taken another. I'll definitely be making these again.


Recipe - adapted from Crunchy Creamy Sweet 
Makes about 24
  • 260g/9oz plain flour
  • 1.5 tsp baking powder
  • 115g/4oz butter
  • 225g/8oz granulated sugar
  • 2 large eggs
  • 1/2 tbsp lemon extract
  • 2 tbsp icing sugar, plus 65g/2.3oz for rolling
  • Yellow food colouring (optional)
  1. Preheat the oven to 180°C/350°F/Gas Mark 4 and line 2 - 4 baking trays with parchment.  (It really depends on the size of your oven.  Mine is quite small so I could only get 6 biscuits on each tray.)
  2. Put the flour and baking powder into a medium bowl and mix together.  Set aside.
  3. In a separate, larger bowl, cream together the butter and sugar until pale and fluffy.
  4. Add the eggs one at a time, and mix in after each addition.
  5. Mix in the lemon extract, food colouring and 2 tbsp icing sugar.
  6. Add the flour mix and beat until just combined.  The result will be a sticky dough.
  7. Put the 65g/2.3oz icing sugar into a bowl.
  8. Put some of the icing sugar on your hands and then roll the dough into balls about 5cm/2inches in diameter and then roll in the icing sugar so they have a thick coat.
  9. Put the balls on the prepared trays, spaced 5cm/2inches apart as they spread when cooking.
  10. Bake for 12-14 minutes.  The cookies should have spread, puffed up in the centre and the edges and bottom should just be starting to turn golden brown.
  11. Remove and allow to sit on the tray for 2 minutes before transferring to a wire rack to finish cooling.  If you want, you can sprinkle extra icing sugar on top.