Showing posts with label sugar cookies. Show all posts

Friday, 14 September 2012

Chocolate Covered Sugar Cookies - 'Portal' Themed


Cookies!  Sugar cookies to be precise.  From an American recipe that came with the cutters so they are quite chewy.  The cutters were a present from the fiancĂ© and are related to a video game called 'Portal' of which I am rather fond.  When I saw these cutters I knew I had to have them.  So how nice it was that I got them for my birthday.  It's only now though that I had a chance to use them.

All the cookies are covered in milk or white chocolate, with a tiny touch of strawberry chocolate where I needed some pink.  The orange and blue is just tinted white chocolate.  I love my blossom tint powder!  Not the neatest icing job I admit.  I only piped the pink.  Everything else was dipped, or spread on with butter knives and skewers.  It all still took me over an hour to do them all.  The Companion Cubes (the squares) were the trickiest since they had lots of little pieces to be dipped and stuck on without losing half the chocolate.

They are very yummy!  Quite soft but still delicious, especially with the chocolate.  The Turrets (the little three legged robots) are my favourite I think.  The fiancĂ© keeps wanting to eat more of them and is having to restrain himself.


Recipe - adapted from the recipe that came with the Portal 2 Cookie Cutters
Makes 2-3 dozen cookies, depending on the size and shape of your cutters 
  • 390g/13.8oz plain flour
  • 1/2 tsp salt
  • 185g/6.5oz unsalted butter
  • 250g/8oz caster sugar
  • 1 egg
  • 1.5 tsp vanilla extract
  1. Sift the flour and salt together in a small bowl and place to one side.
  2. Using an electric mixer, beat the butter until it is really creamy. (You can do this by hand but it will take a while).
  3. Slowly add the sugar whilst still beating.  Remember to scrape down the edges of the bowl occasionally. 
  4. When the mixture is pale and fluffy, add the egg and vanilla extract and mix in.
  5. Add half the flour and beat slowly until all the flour is absorbed.  
  6. Add the remaining flour and beat until a dough forms.  (My hand mixer couldn't take this step so I had to do it with a spoon and then scoop the dough together with my hands at the end).
  7. Divide the dough into two halves, flatten each half into a disk and then wrap in clingfilm.  Refrigerate for at least 2 hours (mine was in there for about 6).
  8. After the 2+ hours, remove from the fridge and let sit for 5 minutes.  Meanwhile, flour a work surface and preheat the oven to 180°C/350°F/Gas Mark 4.  Line baking trays with greaseproof paper.
  9. Roll out the dough so it's about 0.5cm/0.25inches thick.  Cut out your shapes and place on the baking tray.  Scoop together any scraps and roll out again.  Repeat until it's all used up.
  10. Bake the cookies for 10-15 minutes until the edges are a slight golden brown. 
  11. They will be soft when removed from the oven but they firm up as they cool.  Transfer to a cooling rack once out of the oven.
  12. Decorate as you please.  To decorate these specific cookies, I used about 100g/3.5oz white chocolate, 75g/2.6oz milk chocolate, 25g/0.8oz strawberry chocolate (and used the leftovers to make a bunch of tiny hearts from a mould), and orange and blue blossom tint.

Saturday, 26 May 2012

Failed Experiment: Rainbow Spiral Cookies

So I'm not posting the recipe of this one because it really was a disappointing result.  There are actually 3 colours in there but because the green faded you can only see pink and yellow.  It's also a shame that the cookies ended up so flat.  I would have preferred it if they'd been a bit fatter, so I need to find a better recipe or maybe use less sugar.  We shall see.  Anyway, here is what I ended up with:


More recipes to come this weekend.  I'm making lemon ice cream, gingerbread cake and Florentines!

Coloured Sugar Biscuits

Yesterday I was feeling down.  My dear Jess had linked me an interesting idea and I thought I would try.  So, I made two different batches of what I hoped would be rainbow sugar cookies.  The recipe I was linked called for a sugar cookie mix, but I like to make mine from scratch.  Thus I went looking for sugar cookie recipes I could use.  The first mixture I made was too sticky to use for what I want to do but I figured I wouldn't waste the mix.  The second lot was a better consistency but the end result was a disaster.  The biggest problem was a matter of aesthetics.  They tasted fine.  But I blame on the food colouring for the poor finish (and possible too much sugar).  I have to say Morrisons, I am disappointed.  Your yellow and, to an extent, your pink worked quite well but your other colours either ended up looking very unappealing (red) or vanished entirely (green).  Such a shame as I reckon these would have looked lovely if they'd remained a decent colour.  Oh well, something I will definitely be trying again with different colouring.

So this entry is for mixture 1.  


This is the sugar cookie mixture I used for those Peek Freans I tried a couple of weeks ago, except I added more flour to try and get a thicker dough.  It didn't work as well as I hope.  Could still just about roll it into a ball though.

Recipe - Made about 35 - Adapted from Allrecipes.com

  • 110g/4oz softened butter
  • 190g/6.7oz caster sugar
  • 1 egg
  • 1 tbsp vanilla extract
  • 260g/9oz plain flour
  • 3g/0.1oz baking powder
  • 1g/pinch of salt
  • Food colouring
  1. Preheat the oven to 180°C/350°F/Gas Mark 4 and line 3 baking trays with greaseproof paper.
  2. Cream the butter and the sugar until pale and fluffy.
  3. Beat in the egg and the vanilla.
  4. Sift together the flour, salt and baking powder and combine with the sugar mixture.
  5. Separate mixture equal portions depending on how many colours you are using (so 3 portions for 3 colours, etc.) and place in individual bowls.
  6. Add food colouring to each bowl and combine with the mixture.
  7. Roll the mixture into equal sized balls and place onto the trays.  I had 5 colours and got 7 balls from each portion of mixture.  You want your dough to look quite dark in colour because it will lighten up when cooking.
  8. Bake in the oven for 15-20 minutes.  They will still be a bit soft when ready to come out.
  9. Remove from oven and leave on tray for a couple of minutes, before transferring to a cooling rack.
 

Saturday, 5 May 2012

Failed Experiment - 'Peek Freans'

(There is now a successful recipe for these, which you can view here, though they are not actual Peek Freans, just something inspired by the description.)

Bah.  It really doesn't seem to be my week.  First the chocolate chip cookies, and now these.  Of course, these were an experiment based on mixing a few things which ended up not working.  But still.  I do hate it when things don't work out.  However, I still think I should blog about these things.  Good to keep track of mistakes so I don't make them next time.  Hence, I'll have entries labelled as failed experiments, which will not include recipes.  Hopefully I'll perfect the ideas and then I can post successful entries with recipes.


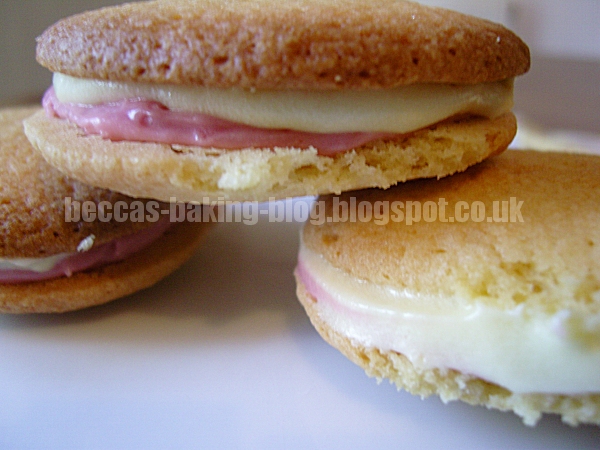
Anyway, the idea for these came from watching the first season of 'The Fringe'.  At one point in one of the episodes, a character is offering up cookies.  He calls them 'Peek Freans' and says they are comprised of a vanilla wafer with a lemon cream and raspberry centre.  It sounded interesting so I went hunting for a recipe for such a thing.  I could not find one.  'Peek Frean' is apparently a biscuit company and were the ones that developed Bourbon biscuits.  But nothing like described in the show.  So I decided I would try and make my own version by finding recipes and combining elements.  For the vanilla wafer I ended up doing a vanilla sugar cookie recipe.  They turned out rather nice and would work very well on their own.  For the filling, I found a recipe for uncooked fondant which is usually used for the inside of sweets.  I went with this idea as investigation into Custard Cremes turned up that the filling is a fondant.  Unfortunately, this fondant was what ruined it for me.  It is far, far too sweet.  Teeth rotting-ly so.  I blame the golden syrup, which I substituted for the light corn syrup the recipe asked for because from what I read, that is the UK equivalent, with treacle being the equivalent of dark corn syrup.  

Flavouring the fondant was interesting.  I really wasn't getting the lemon through in my lemon one.  You could smell the raspberry in the other one but I don't feel I could taste it.  Obviously need to work on this area.  Also, I will run whatever I use for the raspberry flavour through a sieve first to get rid of the seeds.

When I try this out again, I'll use the same biscuit recipe because, as I said, I rather liked them.  However, I would probably make the biscuits a lot smaller.  They ended up too big, especially considering there are two sandwiched together.  I'm also abandoning that fondant recipe entirely.  I'm thinking I could just use ready to roll fondant icing.  I really like the taste of that type of icing and it's easy to colour.  I don't know about flavouring it though but then, that's what experimenting is for.

Edit - 21:25: Well, my boyfriend just got in from work and tried one.  He really likes them!  He can taste the lemon really strongly and got a hint of the raspberry.  So that's good.  Someone will enjoy them.